Preparation Guide For macOS High Sierra Installation
Here’s everything you need to know before upgrading to macOS (10.13) High Sierra. macOS upgrades usually go fairly smoothly, but it’s always wise to take a methodical approach.

macOS High Sierra is rolling out on September 25.
Day One Decision
The first step in this process is to decide if you even want to upgrade on the day High Sierra is released. On the plus side, you’ll be taking advantage of all the security upgrades at the earliest opportunity. On the other hand, it’s often wise to monitor the situation to see if there are any grave issues cropping up.
In the process of installing the public betas, I never had any problems with my MacBook. High Sierra appears to me to be a very stable upgrade.
However, there will always be some users who, for some reason, have a problem. The trick is to determine if the problem is specific to that user or is widespread enough to wait for a community consensus and perhaps a fixed release from Apple. The major Apple websites, including this one, will report on any serious issues. Thigs should sort themselves out by the evening of launch day.
Prior to making this go/no-go decision, there are some important steps you can undertake in the meantime.
App Compatibility
Almost all users have favorite apps. Many have a workflow for their professional work or even a hobby. The first thing to think about before you even decide to upgrade your OS is to make a list of what we call “mission critical” apps and then determine if they’re all compatible with High Sierra.
Chances are good that the apps you have in your dock are the apps you need to check, but there may be some important but seldom used utilities or applications not kept in the dock. Places to look are /Applications, /Applications/Utilities and /Users//Applications. In the latter case, if multiple users have often used accounts, say, other family members, you may have to check with those other users.

Roaring Apps is crowd sourced database of app compatibility with max OS.
To determine if an app is compatible with High Sierra, a good place to start is RoaringApps. If the information there isn’t definitive, you will have to go to the developer’s website and look for affirmations or notes on the support page as to whether the app is supported in High Sierra.
An equally valuable approach, before you start the upgrade, is to reboot your Mac and then re-launch your mission critical apps one-by-one to see if they’re inviting you to update to a new version.
Finally, see Jeff Gamet’s “Here are Some Apps that Are (or Maybe Aren’t) macOS High Sierra Compatible.”
System Integrity
From time to time, rarely, the Mac’s file system, HFS+, can become corrupted. If you try to upgrade the OS with a corrupted file system, some very bad things can happen, the least of which is a failed install. The way to check this is with /Applications/Utilities/Disk Utility.app. Select your Internal drive’s boot partition, and then at the top of the main window, select “First Aid.”
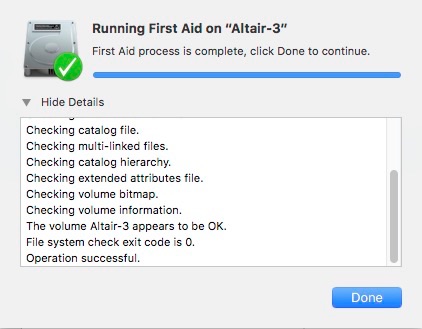
First Aid looks for directory/volume corruption.
Disk Utility can usually fix any minor problems. If it cannot, you may need a more powerful disk repair utility. These are the kinds of utility apps I mentioned above that need to be checked for High Sierra compatibility. That’s because, depending on the kind of Mac boot drive you have, your file system may be force-upgraded during the install from HFS+ to APFS. More on that later.
Next page: backup strategy and install.
Back Up Your Mac
Okay, all your mission critical apps are ready and your boot drive is in good shape. There’s one more critical task before you can go for the upgrade. And that’s the critically important backup in case something goes wrong during the install.
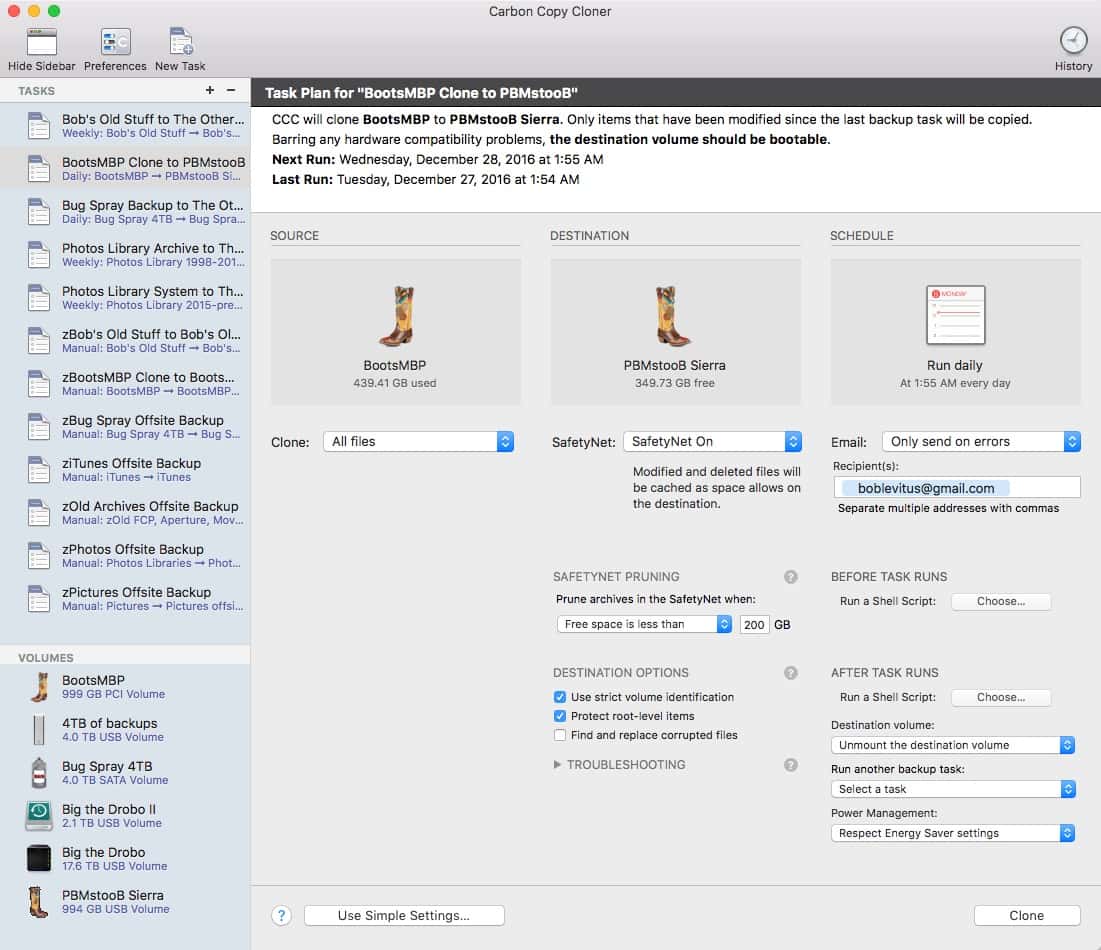
Carbon Copy Cloner is just one example of a great backup tool. Creates a bootable clone.
There are many ways to back up your Mac. There’s also the issue of how many different ways to do it. Here are some general recommendations.
Cloud backup services are increasingly popular, and they’re either attractive to you or not. I tend to steer away from them because 1) If your Mac cannot get on the internet after an install, you may lose access to the backup data on that Mac, 2) Depending on your broadband bandwith, it can be frustrating to wait for backups and restores. Accordingly, your first line of defense should be a local backup.
The easy, obvious and fast way to back up your Mac locally is with Apple’s own Time Machine. Go to your System Preferences, select Time Machine, and make sure Time Machine has been on and your latest backup is current.
While Time Machine is, in the opinion of some, not the greatest backup system ever, it’s also every Mac user’s first line of defense.
But you shouldn’t be satisfied with that because a Time Machine archive could have become corrupted or be uncooperative at the very moment you need to restore your Mac. I recommend a second local method.
Apps that can make a backup of your boot drive (and in some cases a bootable clone) include Data Backup Mac (Prosoft Engineering), Super Duper (Shirt Pocket), and Carbon Copy Cloner (Bombich Software). There are many others. I am most familiar with CCC and know that it is fully ready to continue your (bootable clone) backups with High Sierra.
A bootable clone is very helpful because if the upgrade fails and the Mac somehow won’t boot properly, you can connect that drive with its bootable clone, hold down the option key at power on, and select it to boot from. From there, you can begin the diagnosis (and/or restore) of the internal drive. More on that process is beyond the scope of this overview.
With your Mac backed up to Time Machine and well as a second method,
you should be in good shape to proceed. If you’ve been using a cloud backup, this is a good time to also make sure you have a recent update of your critical data.
The Upgrade to High Sierra
In the past, it’s been recommended that you disconnect all peripherals except the keyboard and mouse. That’s to make sure there are no conflicts with older device drivers. Lately, most users have not had to do this, but it’s not a bad idea. Reconnecting your devices after the upgrade, one-by-one will help isolate a problem. But it’s a judgment call.
The simplest way to upgrade your Mac is with the Mac Apple Store. On September 25, it’s expected that you’ll be able to go to the Apple Menu on your Mac, select App Store… and see the beautiful graphic that accompanies the High Sierra upgrade.
Before you start the upgrade process, having made sure you have the most recent Time Machine archive, turn off Time Machine. If any other automatic back up operations are scheduled, disable them.
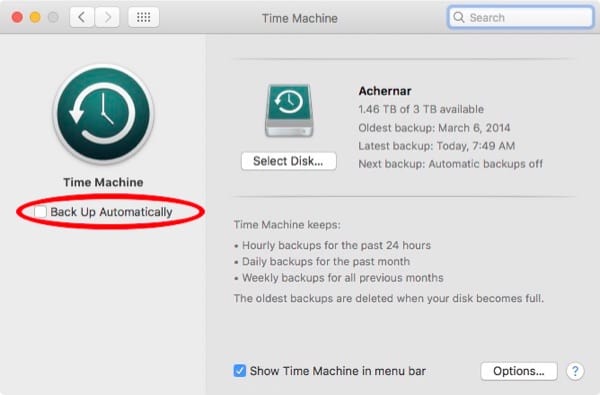
Turn Time Machine and other scheduled backups off.
It’s expected that even if you’ve been a beta tester of High Sierra, this upgrade process will work without any additional steps of fuss to get to the final release.
The Mac App Store will download a file to your /Applications folder that will have a name something like: “Install macOS High Sierra.app.” This file is usually deleted after the upgrade, so if you want to preserve it, before you start the install process, make a copy of this file and put it on a Flash drive or somehere else safe.
Depending on how fast your Mac is, the upgrade could take the better part of an hour. Make sure you also upgrade to Safari 11. It has important security updates.
If you decide instead to do what’s called a clean install, here’s a tutorial for Sierra that should still work. That article has some guidance on whether a clean install is advisable.
Next page: APFS considerations.
HFS+ and APFS
There aren’t many major changes going from Sierra to High Sierra. But one of the most exciting and significant is the introduction of a new file system to replace the aging HFS+. It’s called the Apple File System (APFS). If you’d like to read more about APFS, I recommend this overview by Peter Cohen. “APFS: What You Need To Know About Apple’s New File System ”
If your Mac boots from an SSD, it will be automatically converted to APFS during the upgrade. Unlike the developer betas, you cannot opt out of this automatic update to APFS. Not to worry. APFS has been tested extensively on hundreds of millons of iPhones and iPads already, and it’s ready for prime time. Even if you have File Vault turned on, the conversion will occur.
Related
If you have a Fusion drive, the installer won’t upgrade it to APFS. Some developer betas supported this upgrade for testing, but the final release of High Sierra will not support Fusion Drives.
If you boot from a standard hard disk, the installer will not upgrade the drive to APFS. For more clarifications, see this Macsales blog written by Steve Sande. “Translating Apple’s New High Sierra & APFS Compatibility Document.” This Apple document says that APFS, while not optimized for hard disks, will work with them if you elect to do the upgrade later.
What About External Time Machine Drives?
You should not attempt to upgrade your Time Machine drive to APFS with Disk Utility. Time Machine only works on drives formatted as HFS+. Also, if you format a new drive as APFS for other uses, your Mac won’t recognize it as a Time Machine destination—at least for the current implementation of TM.
For some additional details, see this article by our Jeff Butts. “Time Machine and APFS: What You Need to Know.”
Next page: mopping up.
Mop Up Operations
It’s reasonable to turn Time Machine back on at this point. But if you made a bootable clone before upgrading, you may want put it in a drawer and start your new backups on a new drive instead of overwriting it. That’s just to be sure you can return to your previous state with an archived bootable clone.
The Future is 64-bit
Apple has said that High Sierra is the last version of macOS that will support 32-bit apps. Our Macs a littered with these aging apps, and they won’t run in macOS 10.14, the next version after High Sierra, likely due out this time in 2018.
Going forward. you’ll probably want to catalog your 32-bit apps and monitor the developer’s website or the Mac App Store for the upgrades to 64-bit versions. Some apps may never be updated, so you’ll want to research modern, functional replacements.
To see which apps on your Mac are 32-bit, go to the Apple Menu, then About This Mac, then System Report… Under the Software section, select “Applications.” This may take a few minutes while the Mac searches for all apps. Then sort by the column “64-Bit (Intel)”. Those listed as “No” will have to be updated or replaced by this time next year.
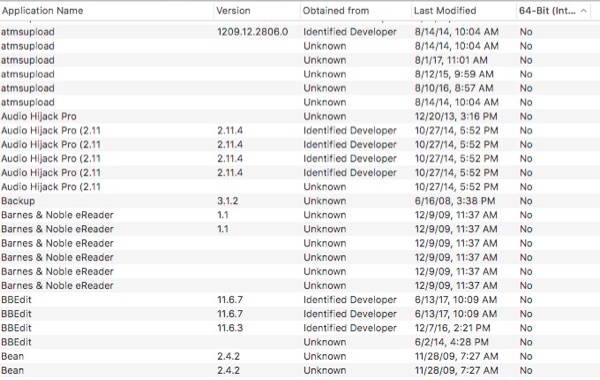
macOS System Report identifies 32-bit apps.
Exploring High Sierra
There are lots of good, detailed, technical articles that provide an accounting of the most visible (and invisible) features of macOS High Sierra. Here’s a good one.
Phew! All done for another year!

0 Response to "Preparation Guide For macOS High Sierra Installation"
Post a Comment