Set Up Your Own VPN Server in the Cloud for Free or Cheap
We’ve talked recently about what our favorite Virtual Private Network (VPN) services were. I kept quiet on that one, because I hadn’t decided on my favorite VPN server. Well, now I have, and it’s one I installed myself. You can do the same, for free or extremely cheap. Let’s look at how it’s done.

Instead of relying on someone else for your VPN server, you can build your own (Image Credit: pixelcreatures)
What’s This About VPNs?
We’ve talked extensively in the past about VPNs. The topic has come back to light of late, with the current United States government repealing certain FCC regulations. Those regulations would have kept internet providers from selling your browsing history.
Andrew Orr does a pretty good job of summing up what a VPN service is and does.
A virtual private network (VPN) is a private network that lets you connect to the web. It works by tunneling your web traffic through an encrypted connection to a server controlled by the provider. Then, from the server it connects to the internet. Using a VPN prevents your ISP or other third parties from knowing which websites you browse to. They can see that you connect to the VPN, but they can’t read the encrypted traffic.
In a nutshell, it’s a way of hiding from your internet provider what websites you’re visiting. It also hides from those websites you browse precisely where you’re surfing from. These services can cost anywhere from $2.99 per month to almost $10 per month.
Why Would I Want to Install My Own VPN?
There are several reasons for this. One, you can’t be sure that your VPN server provider isn’t selling your browsing data to a third party. After all, they’re allowed to do so under law, and some of the existing services are a bit … shady. Secondly, you get much more control over your VPN experience. Third, many existing VPN services are very limited in how much bandwidth you can use. Finally, as the author of my favorite VPN server notes, “They’re crap.” That’s due to shared keys, weak cryptography, and a requirement to trust unseen and unknown people.
What VPN Server Software Should I Use?
I picked Algo for a number of reasons. It’s developed by a community of strongly security-minded folks, and it’s free to use. It also utilizes Internet Key Exchange (IKE) version two, which is stronger, more reliable, and more mobile-friendly. IKE v2 makes configuring your iOS VPN client as simple as possible, and connecting to it is even easier.
Up next: Deciding where to host your VPN Server
Page 2 – Deciding where to host your VPN Server
Okay, You’ve Convinced Me – What Now?
I’m going to show you how to set up your own personal VPN server for free or dirt cheap. The first step is to secure a place to host your server. The two top choices, from my experience, are Amazon EC2 or DigitalOcean. Both of these have pros and cons, however.
Benefits of Amazon EC2
- If you’ve never used it before, it’s free for your first year.
- Netflix works with it, in most cases.
Pitfalls of Amazon EC2
- You only get 750 hours of usage and 15GB of bandwidth with the free tier. The hours might be fine if you’re only using a single device, and you don’t use the VPN from home. However, if you download large files, have multiple devices connecting through the VPN, or use it from home, you’ll burn through that in a matter of days.
The Ups of DigitalOcean
- For $5 per month, you get 1TB of bandwidth and unlimited hours.
- It’s slightly easier to set up than with Amazon EC2.
The Downs of DigitalOcean
- You won’t be able to stream Netflix.
So, once you’ve decided which is your favorite option, go ahead and sign up for that choice. If you’ve decided on Amazon EC2, here’s what you’ll need to do to get everything ready for Algo, our VPN server.
Proceed at your own risk. The next steps do require some basic UNIX familiarity, even though they’re easy to follow.
- Visit the Amazon Web Services page and create a free account. If you already have an Amazon account, you can link the two.
- When you’re logged in, click Services > IAM in the Security, Identity, & Compliance tab.
- Click the Users tab, on the left
- Click Add User
- Create your user name, and then check the box beside Programmatic Access. Once done, click Next.
- Click Attach existing policies directly.
- Type “admin” to search through the policies, looking for one called AdministratorAccess. Click the checkbox next to it, then Next.
- On the last screen, click on the Download CSV button. You’ll be downloading a file that includes numbers and access keys required when you set up Algo. Finally, you can click Close, and you’ll be good to go.
What If I Picked DigitalOcean?
If you decided to go with DigitalOcean, just visit their pricing web page and sign up for the $5/month account. There’s no need to create a Droplet there; Algo will do that automatically.
Up next: Downloading and Configuring Algo
Page 3 – Downloading and Configuring Algo
Downloading and Configuring Algo
Now it’s time to download and install Algo. The installation files you need are hosted on GitHub, but you can quickly download the build files for your Mac on this page. Unzip the file where you want, and it will create a folder called algo-master. Now, follow these steps.
Open Terminal, then type cd followed by the “algo-master” directory location. If you don’t know where it is, just drag and drop the folder into Terminal. Once done, hit Enter.
Now it’s time to get everything else we need downloaded and configured. Type these commands, each on its own line.
python -m ensurepip --user
Now press Enter.
python -m pip install --user --upgrade virtualenv
Again, press Enter
python -m virtualenv env && source env/bin/activate && python -m pip install -r requirements.txt
Press Enter one more time.
If you’ve never installed the cc command line tools, you’ll be prompted to do that. Go ahead and agree, it’s perfectly safe and required to move forward.
Next, when everything is done, type sudo nano config.cfg and press Enter. You’ll be asked for your administrative password, and then a text editor will open. Under the section called Users in the file, type in the names of any users you want to create. These are the people who will have access to your VPN. We’ll talk later about how to add users; it’s painless. Once you’ve added your users, press Control-X to save your changes and exit the text editor.
Installing Algo to Your Cloud Account
Next, we’ll install Algo itself. Just stay in Terminal, and type the following command to kick off the installation process.
./algo
You’ll be asked several questions. If you chose Amazon EC2 for your cloud provider, choose that by typing in the correct number. Type any name for your VPN and choose the closest server location.
From the CSV file you downloaded earlier, get your AWS Access Key and your AWS Secret Key. Copy and paste each number into the Terminal window when the Algo installer asks you for them.
On the other hand, if you chose DigitalOcean, the process is much easier. Make sure you have an API Token from DigitalOcean’s website, and be ready to paste that into Terminal. Choose the option for DigitalOcean, and then you’ll be asked for your API key. Again, type any name for your VPN and choose the closest server location to you.
Algo’s installer will ask about VPN On Demand. This feature allows your Apple devices to automatically connect to the VPN when they need it. Otherwise, you have to remember to turn it on each time. This isn’t so challenging on macOS, but can be a bit of a bear on iOS. Go ahead and answer Yes to that question.
I also answered Yes to the security enhancements, HTTP proxy, and local DNS resolver. You’ll also be asked about trusted Wi-Fi networks. This is entirely up to you, but you should leave it blank if you want to use your VPN from home. If not, enter in the names of your trusted networks with a comma between each one. I’ll explain how to change this later.
The rest of the options are your choice, but I said no to them all and my VPN is safe and secure.
Once you’ve answered everything, Algo will install itself to your server instance. This will take between five and 10 minutes, so go grab a coffee. When the process is done, you’ll be ready to connect to your VPN. I would recommend copying and pasting the final screen into a text file for future reference.
Up next: Connecting to your VPN server from macOS and iOS
Page 4 – Connecting to your VPN server from macOS and iOS
Related
Connecting to Your New VPN
Algo has created everything you need to connect to your new VPN, in the configs/[IP Address] directory. Go to that folder in Finder, and double-click the .mobileconfig file with your username attached to it. macOS will ask if you want to install the profile, so say yes at all of the dialog boxes and enter your password when prompted.
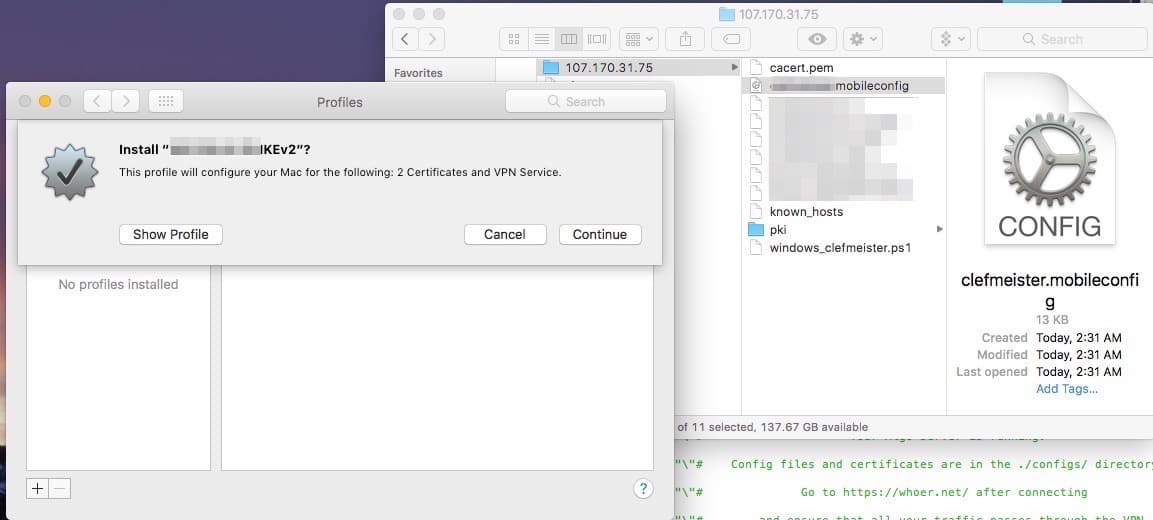
Installing the profile to set up our VPN connection
That’s all you need to do for macOS – assuming you didn’t set your current Wi-Fi network as a trusted one, you will be ready to connect to your new VPN. To do this, simply go to System Preferences > Network. Choose your Algo network device, and click Connect.
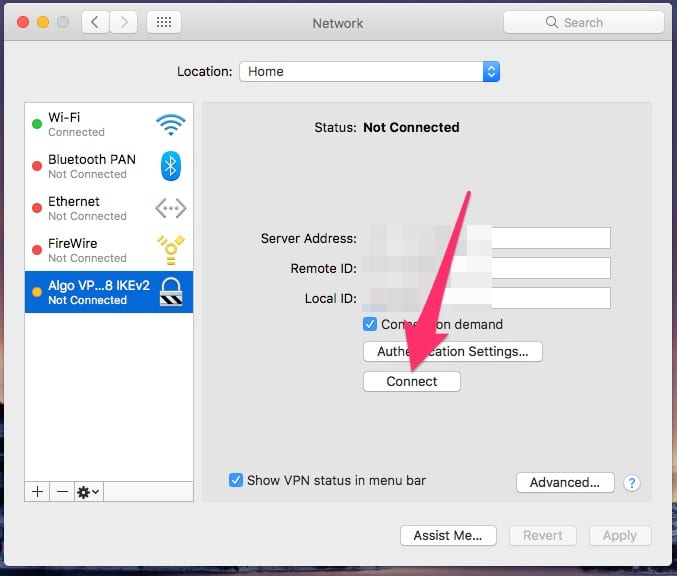
Connecting to the Algo VPN Service
Getting Your VPN Settings to Your iOS Device
To connect to the VPN service from your iPhone or iPad, you’ll need to get that .mobileconfig file to yourself. You can email it to yourself, Airdrop it from your Mac to your iOS device, or use something like iCloud or Dropbox. When asked, confirm the profile installation and your iOS device will connect to the VPN.
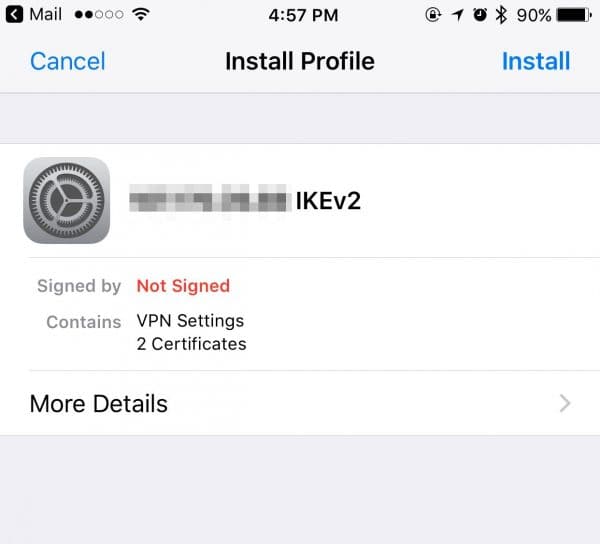
Installing the profile for your new VPN server
On iOS 10.3.1, you’ll now see an option in Settings > Preferences labeled VPN. Toggle it on to connect to your new VPN service. Once you decide you don’t want to use the VPN anymore, toggle it back off.
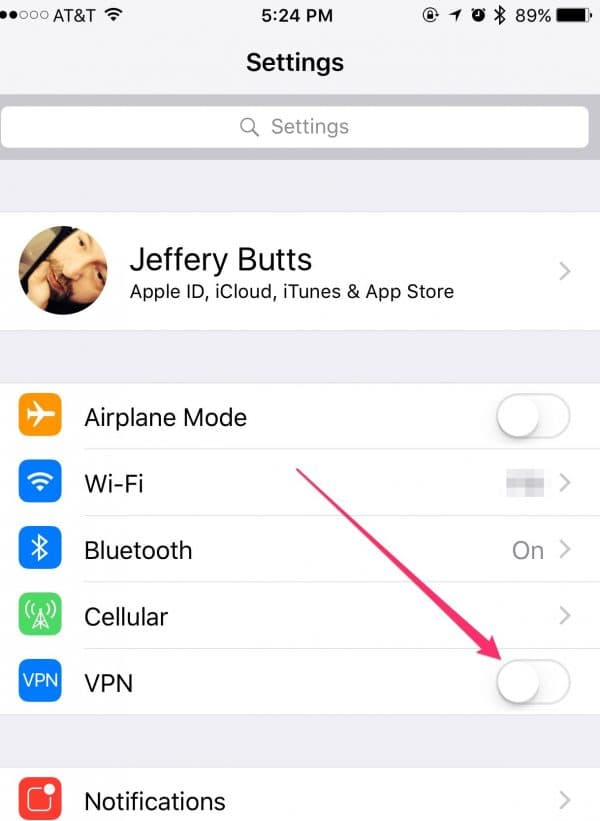
Connecting to your VPN server is as simple as flipping a switch
You can also check out our guide to setting up a VPN on an iPhone with iOS 10.
Up next: Testing and modifying your VPN Server
Page 5 – Testing and modifying your VPN Server
Want Proof That You’re Connecting Through Your VPN?
There are a number of sites that will show your IP address, but let’s pick one. Visit whoer.net both before and after connecting to your VPN, and you should see your IP address change.
Oh, I Need to Add More Users to my VPN
No problem. Algo includes easy scripts to add users. Just modify the config.cfg file from the installation process, and add or remove to your heart’s content. Refresh the user list by running this command:
algo update-users
What About My Trusted Networks List?
This one’s a bit trickier. You could modify the .mobileconfig file with a text editor, but you have to be very careful about that. The safest option is to destroy your existing Algo installation and start fresh. It’s a fairly quick process, since Algo is so slim and fast to install.
Do I Need to Update Algo?
Again, the easiest method here is to destroy your server instance and reinstall. Just make sure you download and build the latest version of Algo.

0 Response to "Set Up Your Own VPN Server in the Cloud for Free or Cheap"
Post a Comment