Here’s How You Can Enable ‘Hey Siri’ on Your Mac
Siri was a welcome addition to macOS Sierra, but there’s something missing. On the iPhone, you can configure the personal assistant to automatically respond to you when you say, “Hey Siri.” Apple, for whatever reason, chose not to provide that option within macOS Sierra. Fortunately, there’s a workaround that will give you that same functionality on your Mac. Here’s what you need to do.

You can configure Siri to respond on your Mac without needing to touch your keyboard (Image Credit: Lukas)
Configure Siri the Way You Want Her (or Him)
First, you’ll need to enable Siri and configure the voice assistant to your liking. If you’ve never set up Siri on your Mac, Melissa Holt does an excellent job of walking you through that painless process.
Set Up Enhanced Dictation
The next step is to make some changes to macOS Sierra’s Dictation settings. Bob LeVitus, Dr. Mac, explains many of the dictation settings in one of his Rants & Raves. We’re going to follow up on that with some more cool dictation tricks. Go to System Preferences > Keyboard > Dictation. There, make sure Use Enhanced Dictation is enabled.
Note that the first time you turn this on, your Mac will need to download a pretty large file (mine was 1.2GB). Make sure you have a fast, reliable Internet connection when you turn this on. You should also make sure the correct input source is selected.
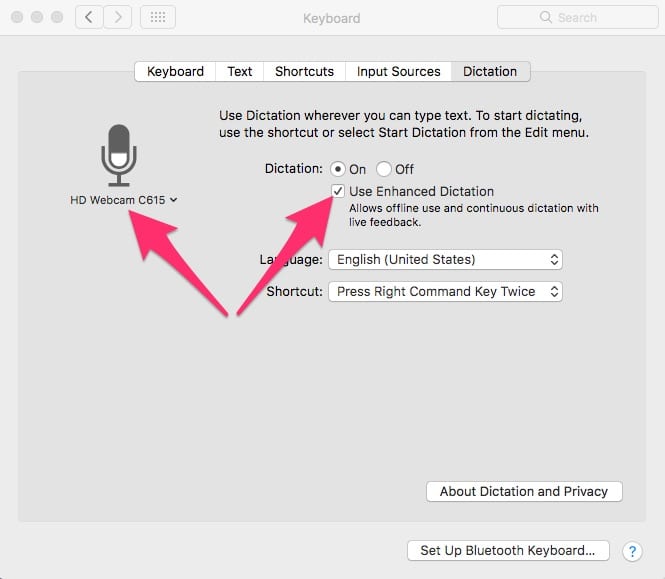
Make sure the correct microphone is selected, as well as “Use enhanced dictation.”
Get Your Accessibility Groove On
Now we want to go to System Preferences > Accessibility. Scroll down until you see Dictation, and click it. Make sure Enable the dictation keyword phrase is selected, and then change it to whatever you want. By default, it will be set to “Computer,” but you can modify that.
A word of warning: you could set this to “Hey,” but then you’d be liable to activate Siri on both your iPhone and your Mac at the same time. I set mine to “Hello,” and it works phenomenally.
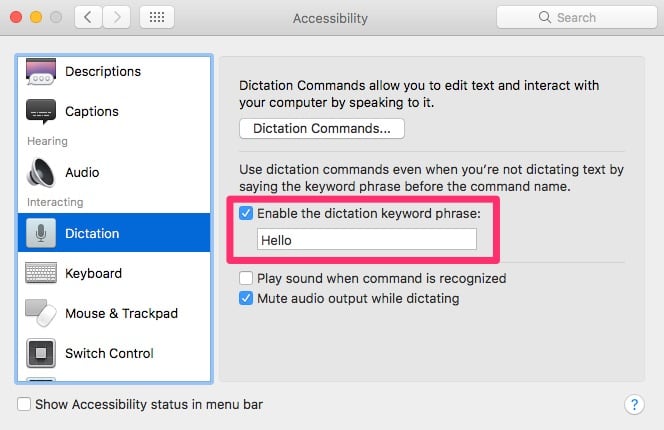
Enable your dictation keyword phrase.
The last step is to configure a dictation command to activate Siri. From the same System Preferences > Accessibility pane, click Dictation Commands. Make sure Enable advanced commands is checked, then click the plus (+) sign. In When I say, type “Siri.” Leave While using set to “Any Application.” Under Perform, choose Run Workflow > Other > Applications > Siri.
Related
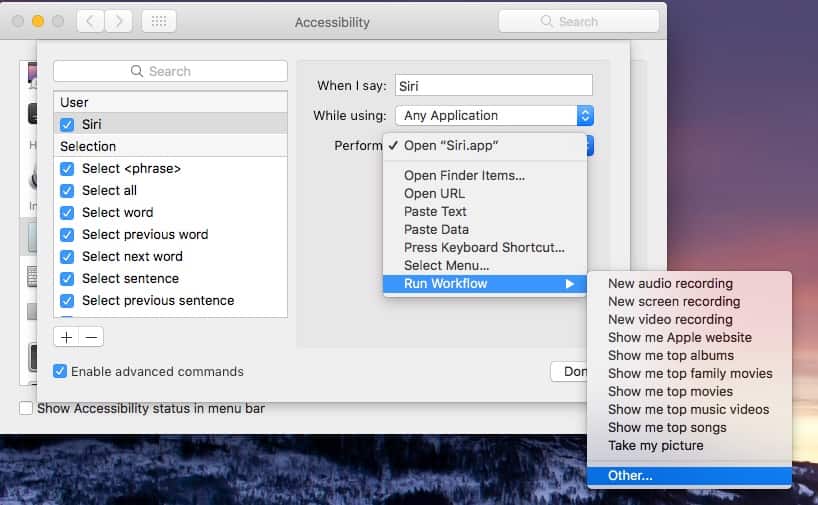
Create the dictation command to launch Siri
‘Hey Siri’ In Action
Once you’re finished, Siri should respond to you saying, “Hello Siri.” If it doesn’t work at first, try disabling and then reenabling Siri. As a last resort, reboot and the workaround should function beautifully after that.
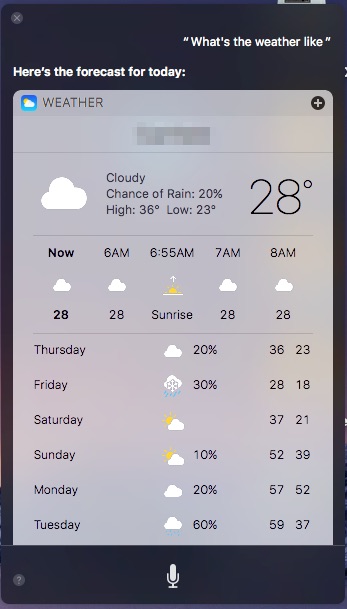
Siri, responding with the weather forecast

0 Response to "Here’s How You Can Enable ‘Hey Siri’ on Your Mac"
Post a Comment