Encrypting Email With iOS Mail – A How-To
Are you frustrated by trying to figure out how to get started encrypting email with iOS Mail? It’s easy in macOS, but not so much so on the iPhone or iPad. I’ve dug into the process, consulted dozens of forum posts and support articles. Then I tested, retested, and tested my process again. As of iOS 10.2.1, the process I detail below should get you going with sending encrypted email under iOS, using Apple’s Mail app.

If you are tired of pulling your hair out trying to get started encrypting email with iOS Mail, this how-to is for you (Image Credit: geralt)
Let’s Start With a Clean Slate
Before we get started, the easiest way to make sure this process is successful is to start off without any email security certificates installed on your iOS device. So, open the Settings app, then tap on General.
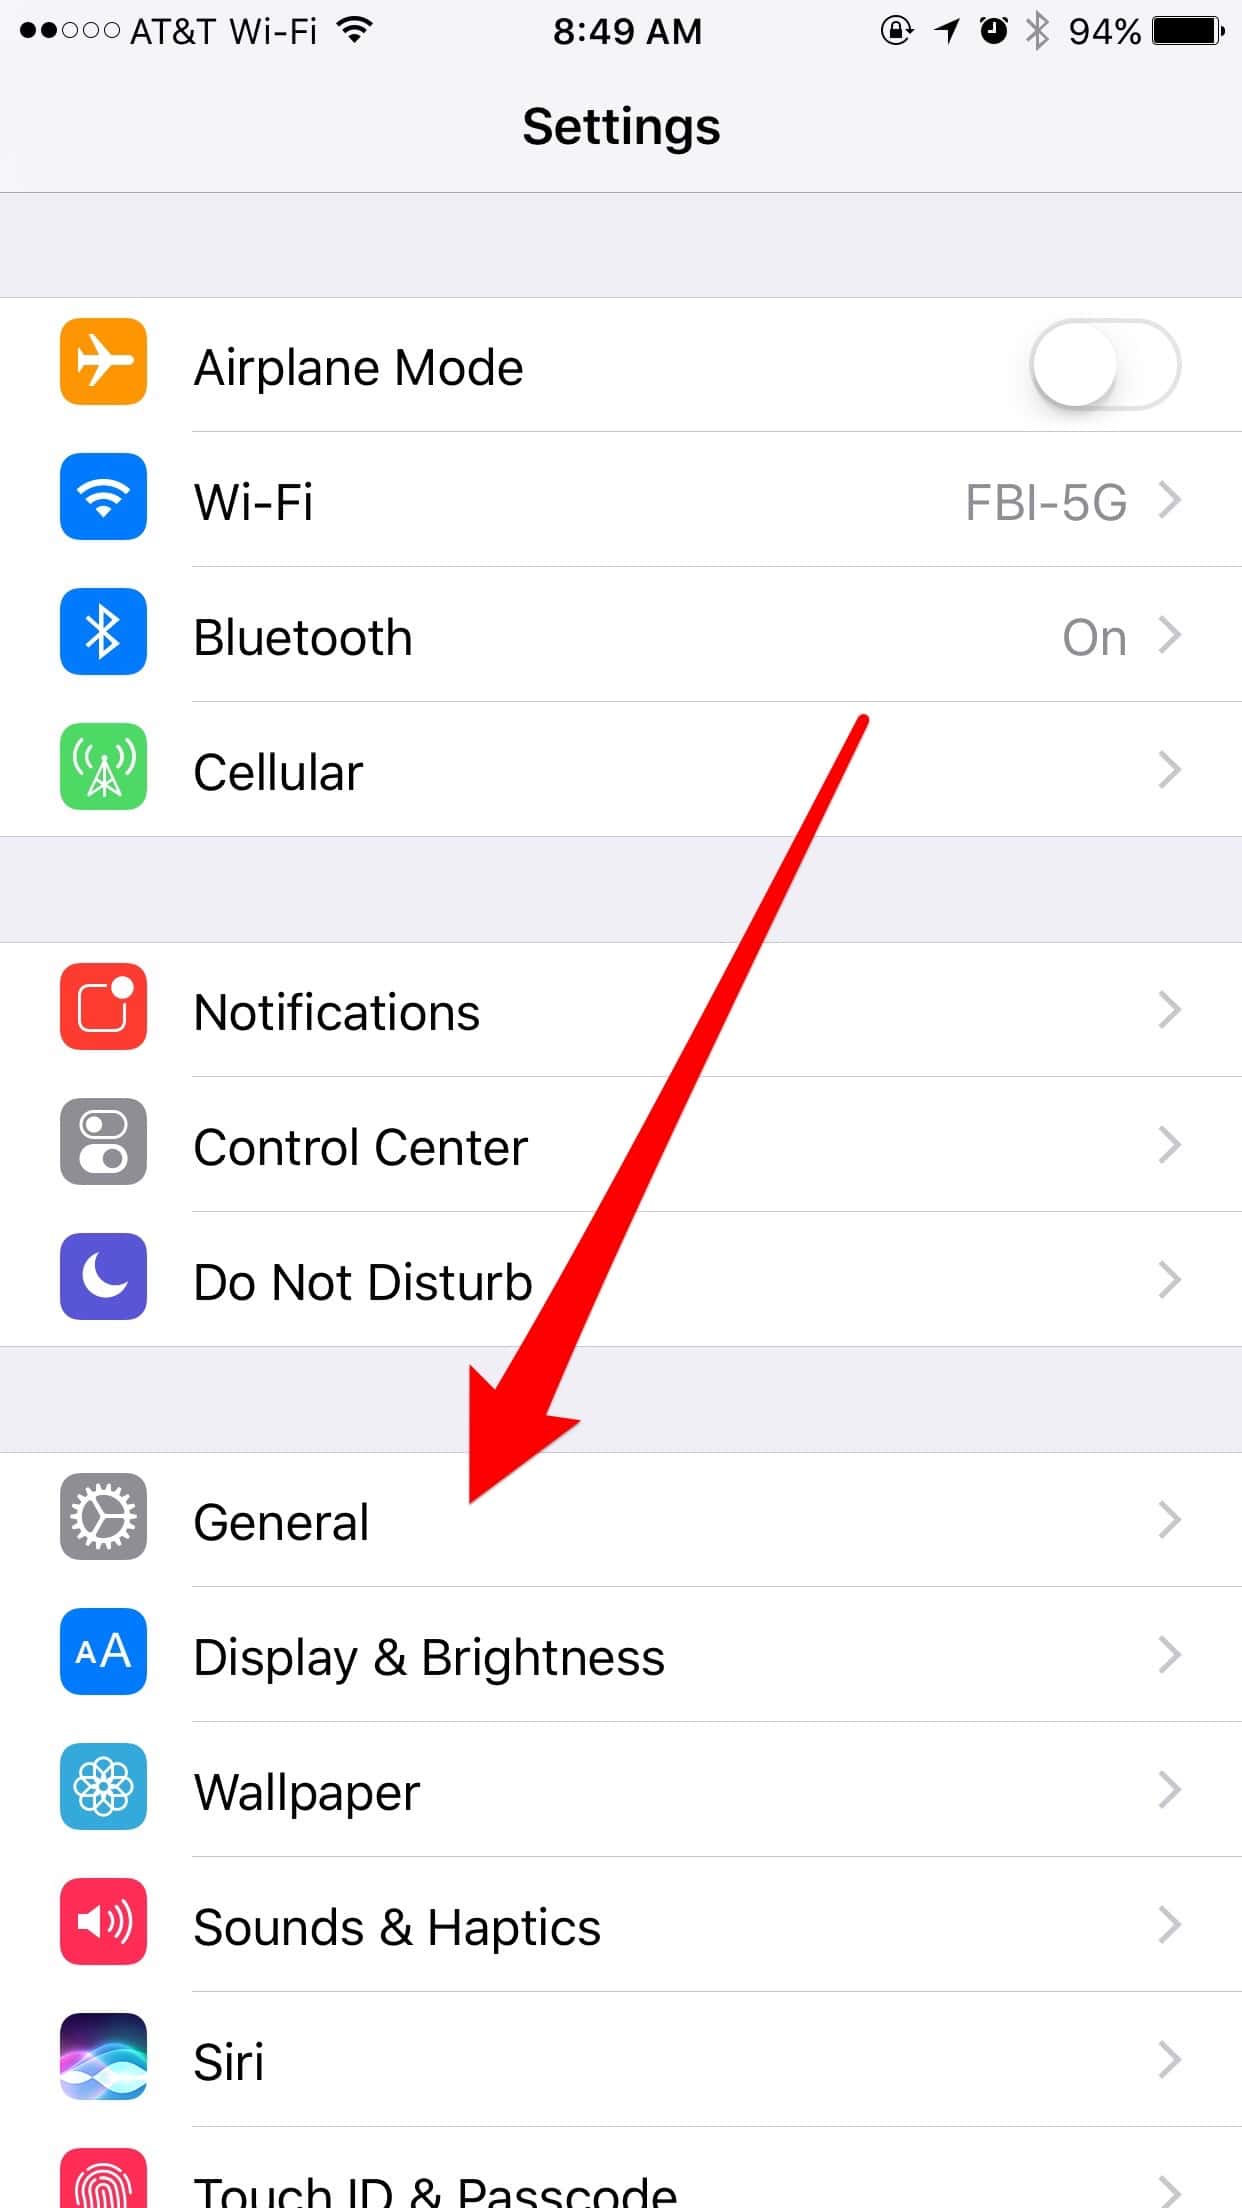
To delete any email certificates you have installed, go to Settings and tap General
On the next screen, scroll down and tap on Profiles.
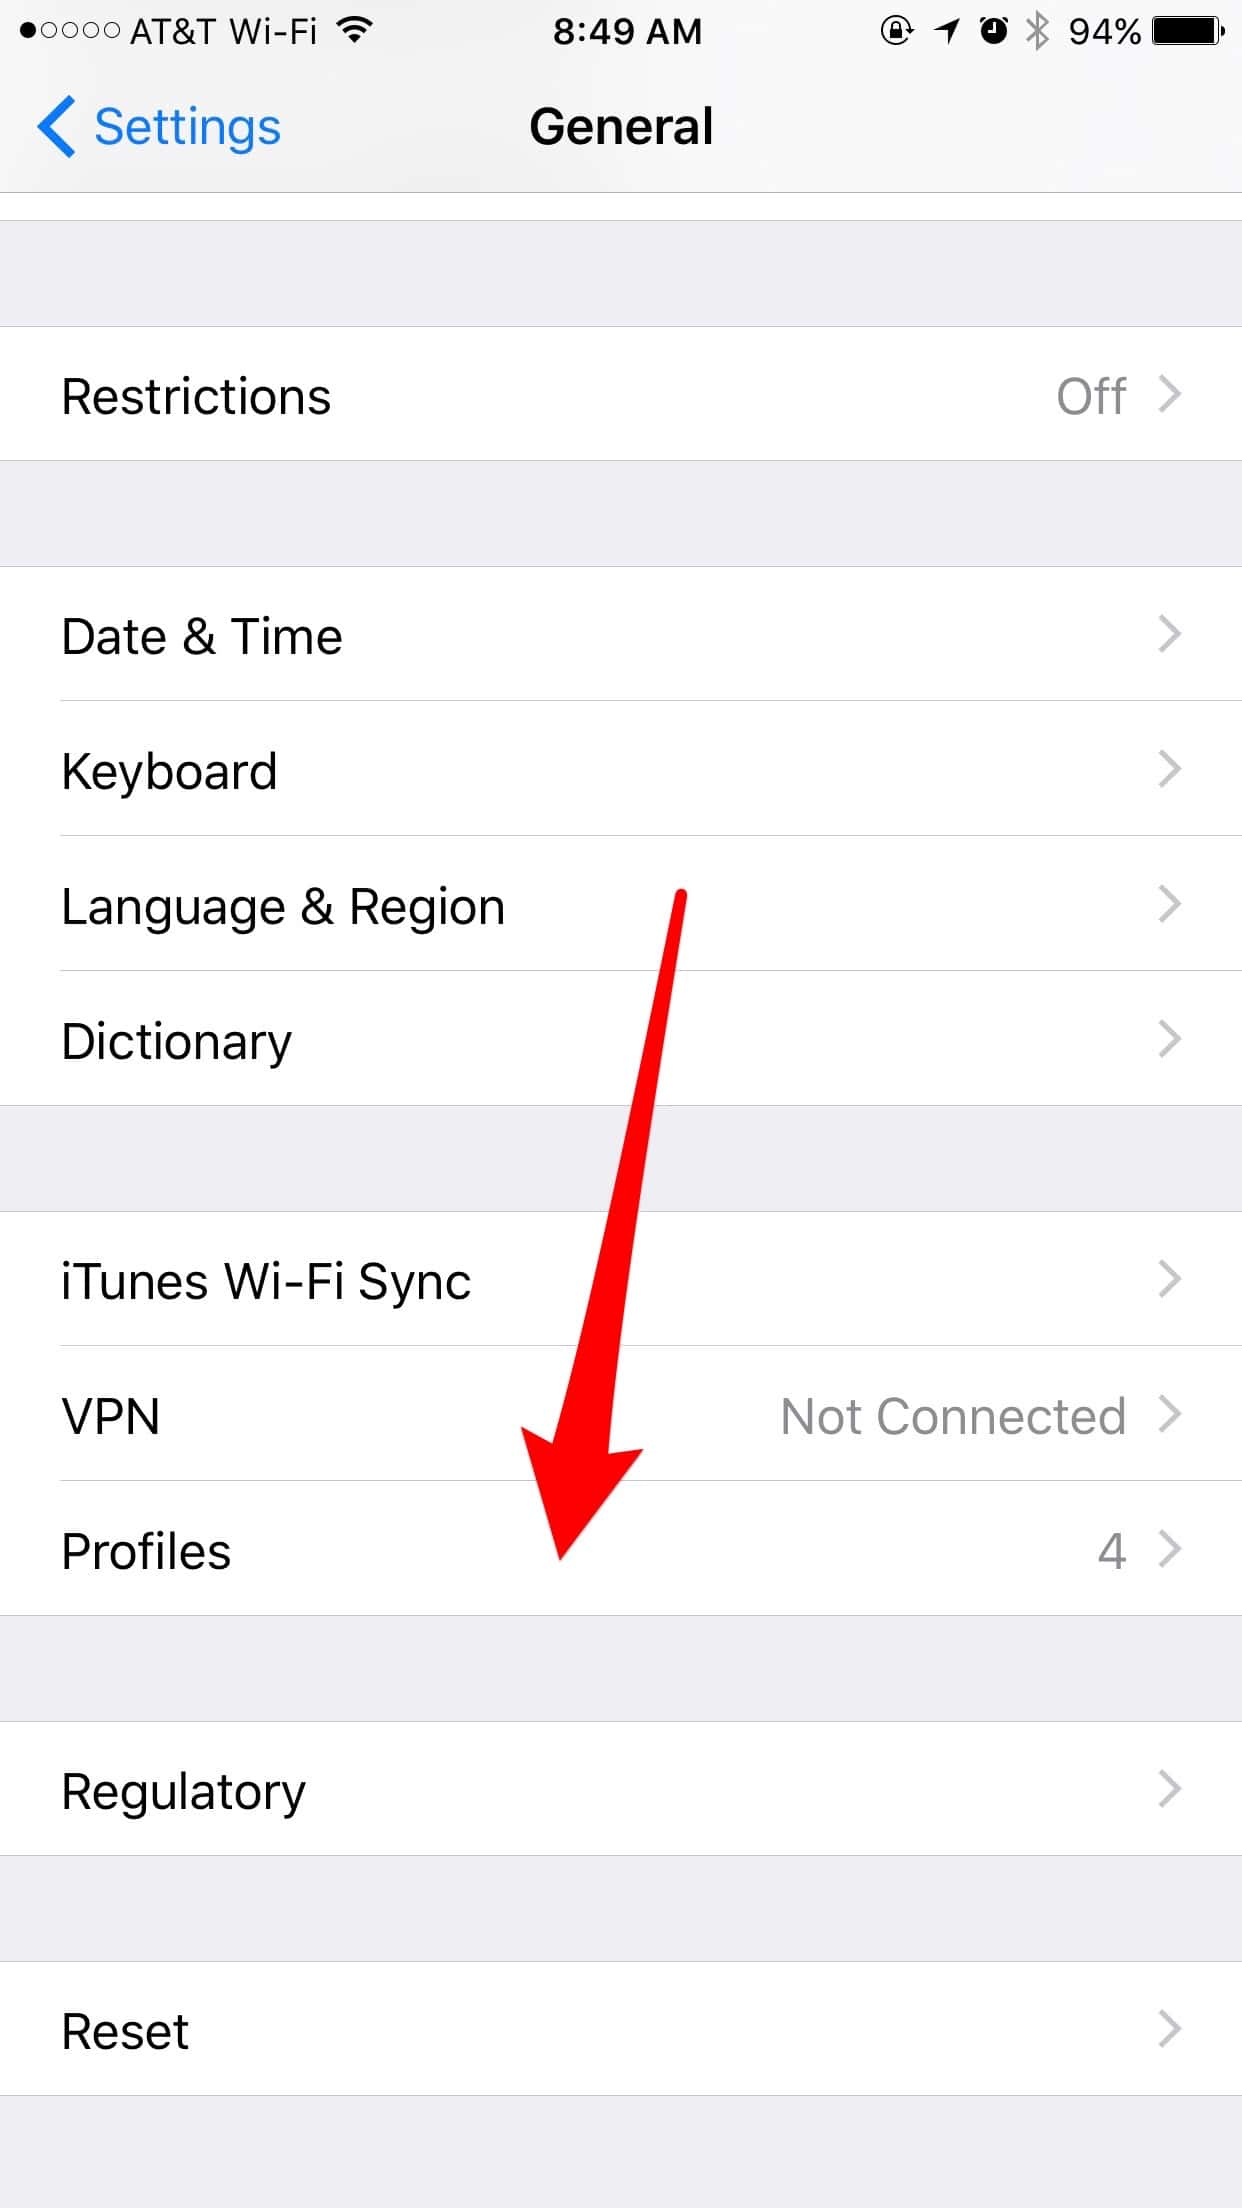
Now you need to visit the Profiles menu
Locate any email security certificates you already have installed. These will typically be named after your email addresses. If you don’t have any, you can skip to the next section. If you do have some, tap on the first one.
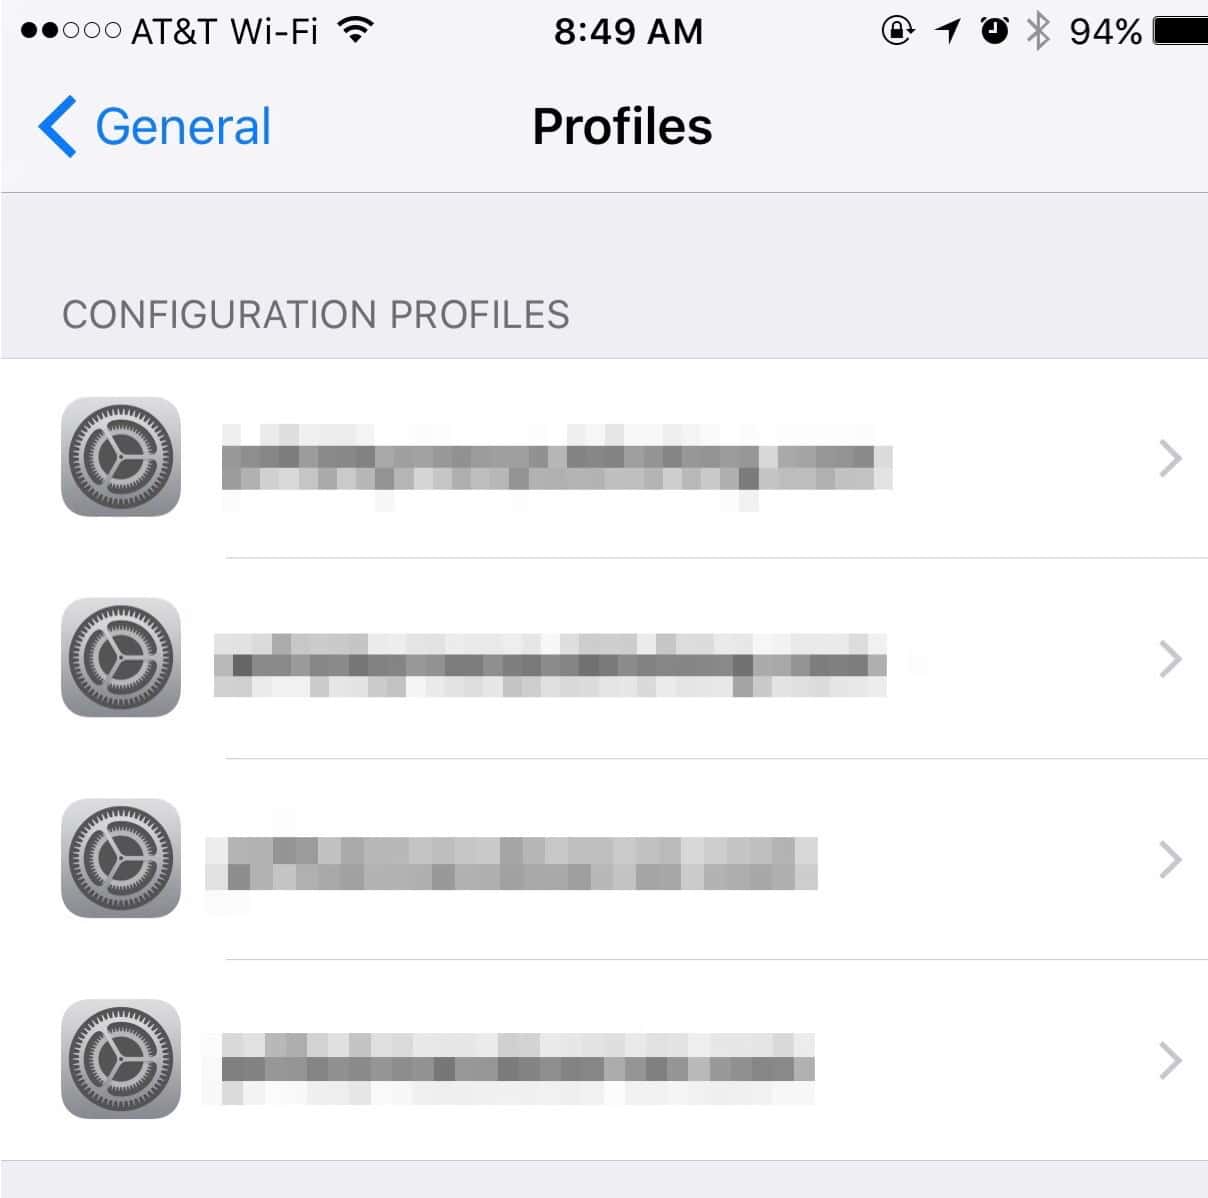
Find your email security profiles
Now tap Delete Profile at the bottom of the screen.
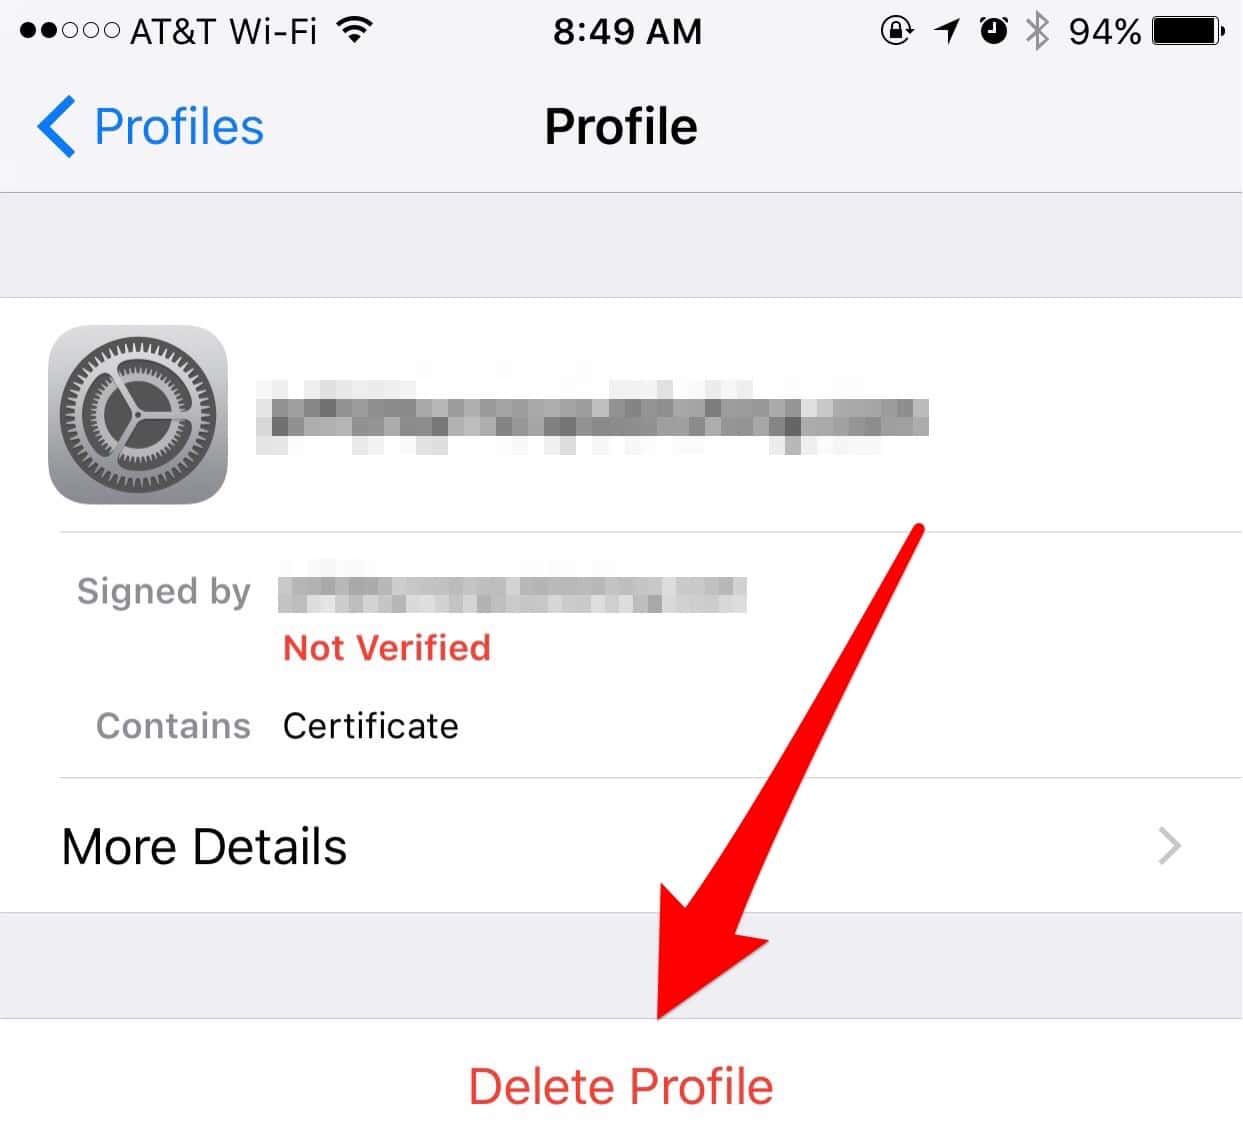
The first step to deleting a profile in iOS
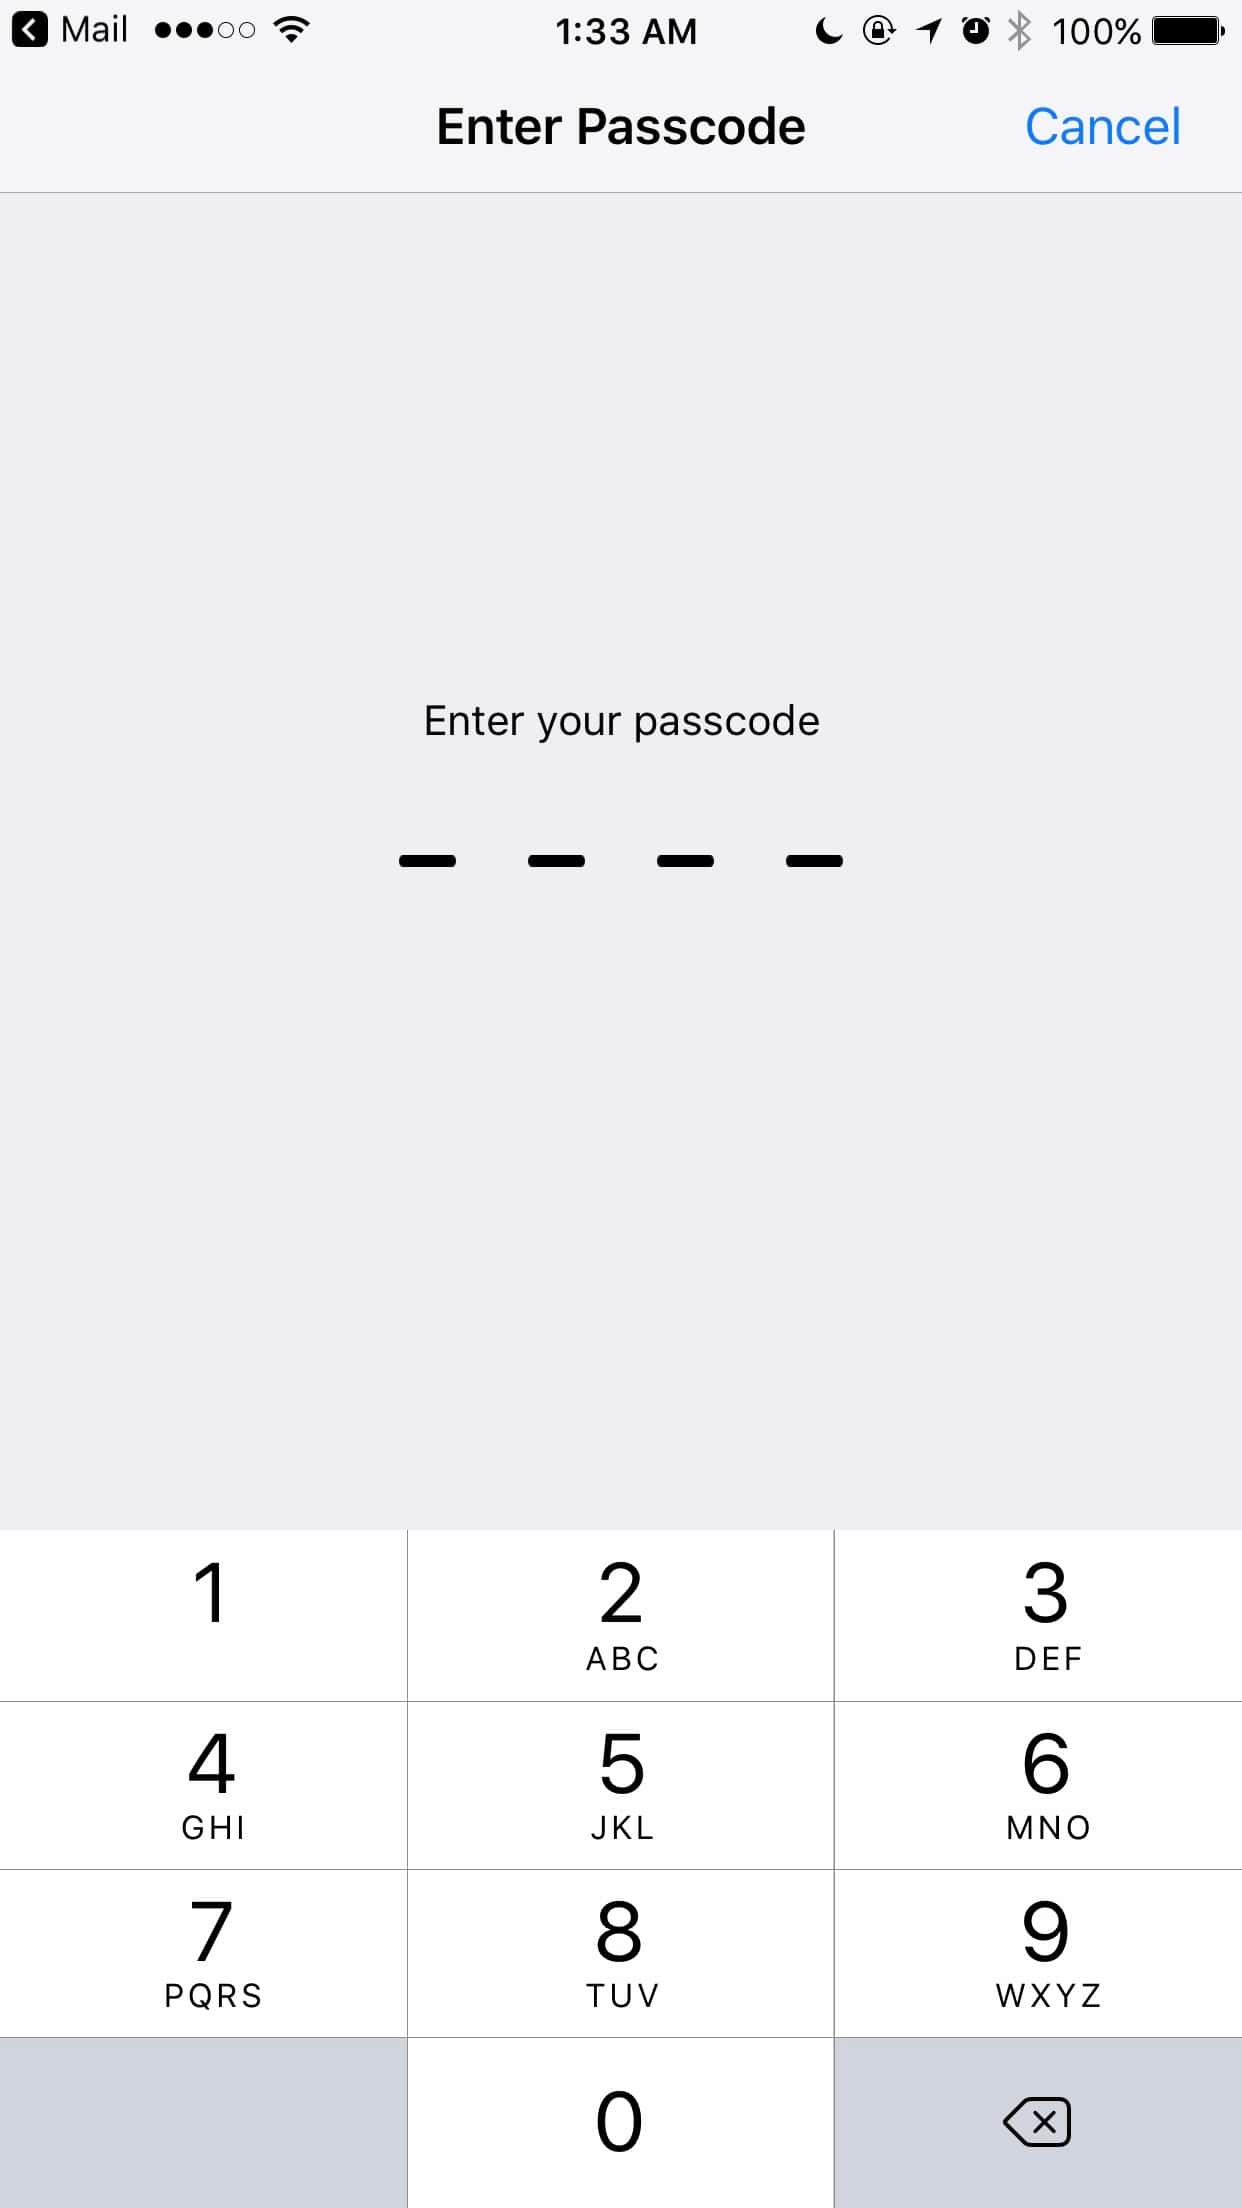
You’ll be asked to enter your passcode, if you have one. Go ahead and do that.

You’ll be asked to enter your passcode, if you have one
Finally, tap Delete at the bottom of the screen.
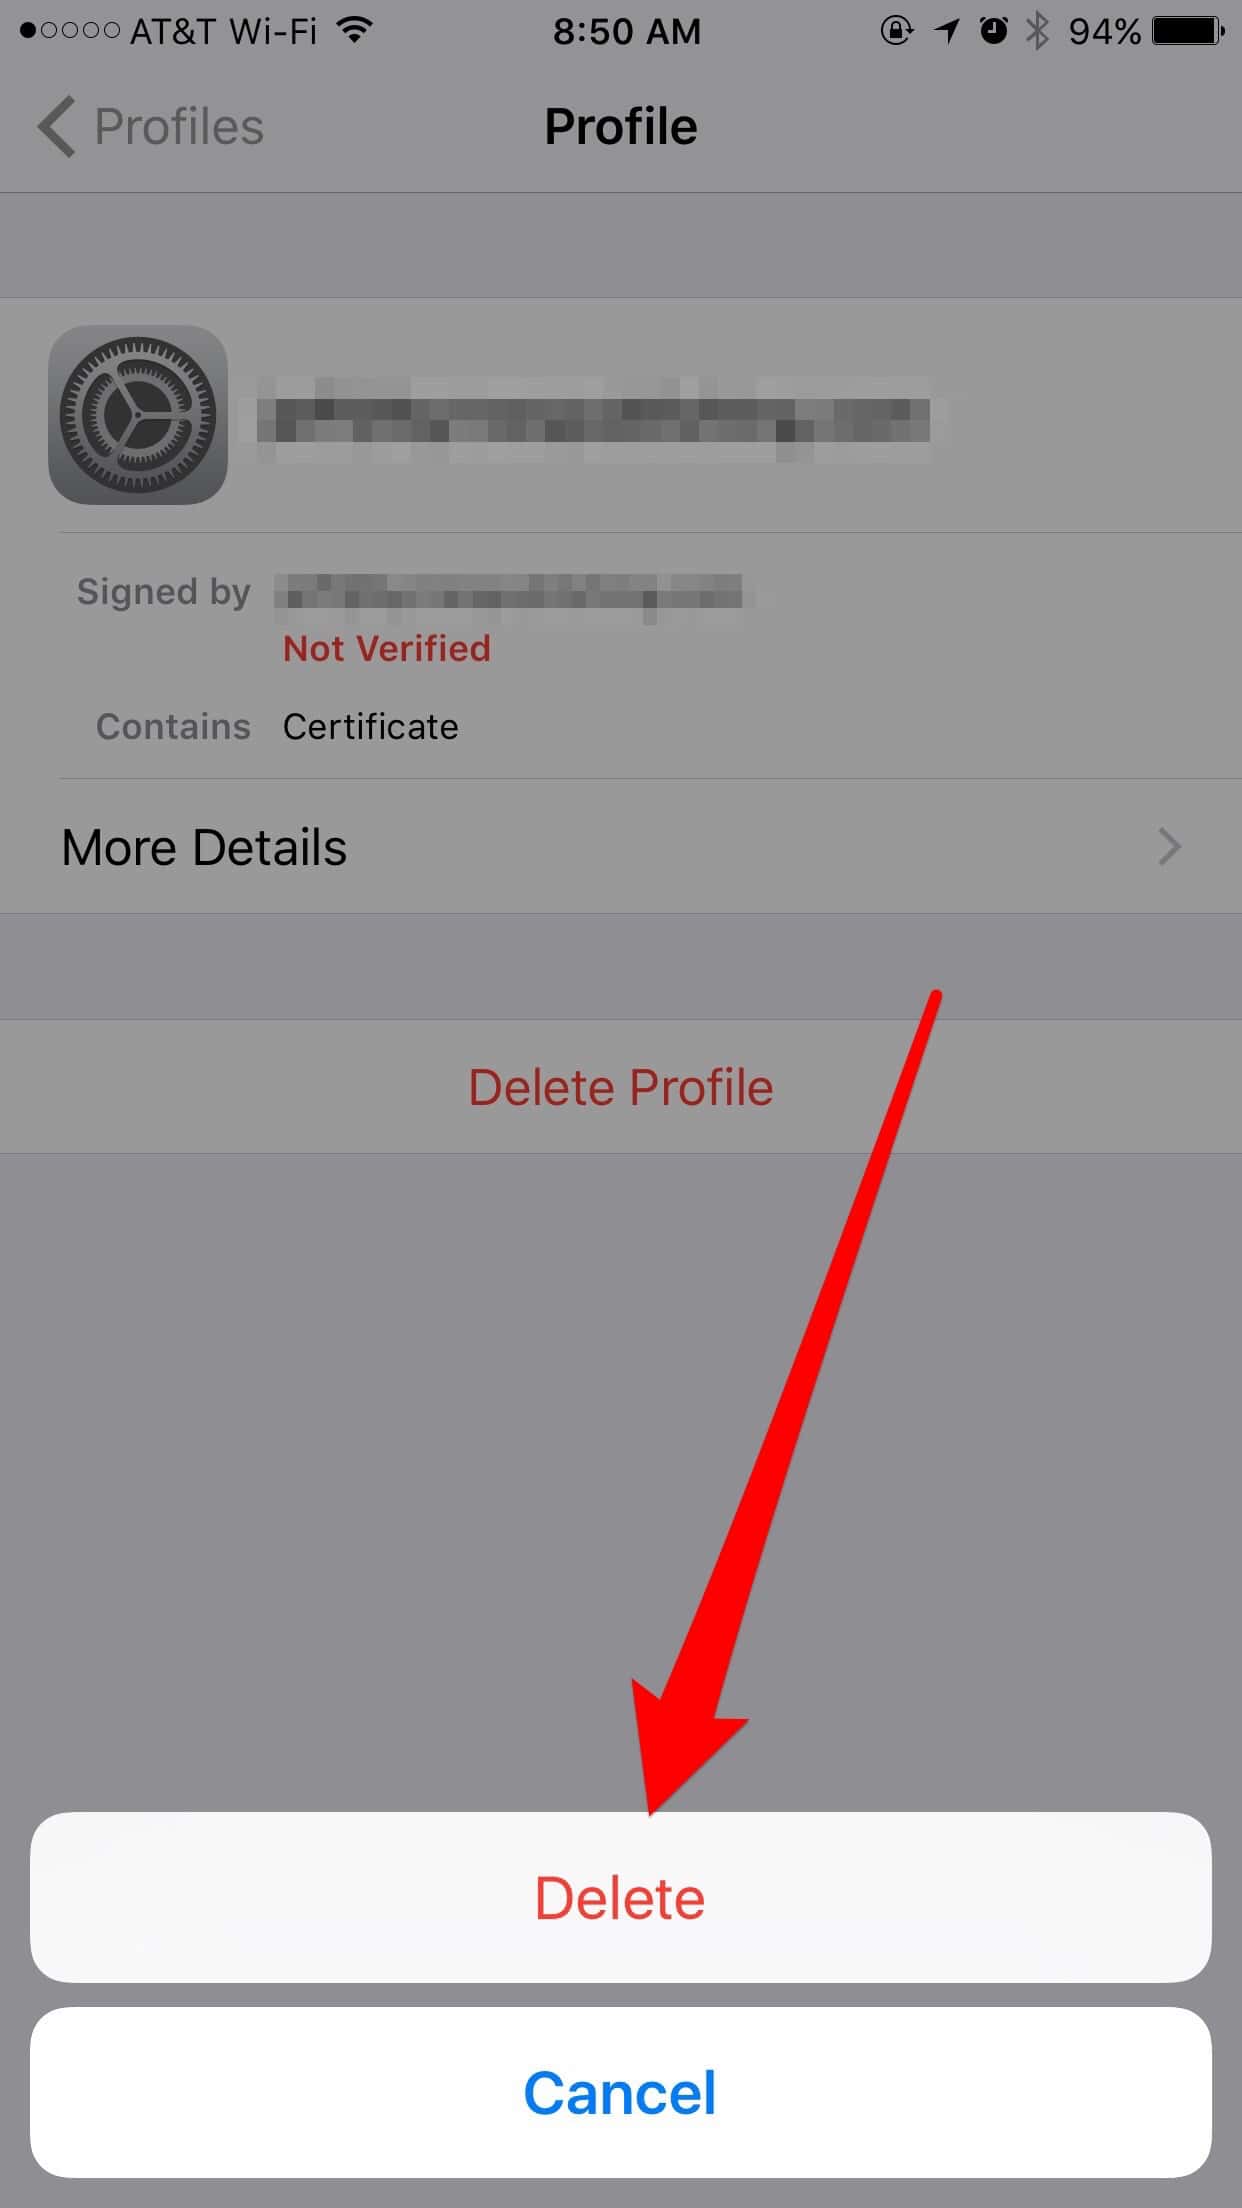
The final step to deleting a profile is to tap Delete once again
Repeat these steps for any other email certificates you have installed on your iPhone or iPad. Next, reboot your iPhone by holding the Sleep/Wake button until you see the red slider, then swipe it to shut down your iPhone. After your iPhone shuts down, power it back on by pressing the Sleep/Wake button again.
Next: Encrypted Email Needs Certificates
Page 2 – Encrypted Email Needs Certificates
To Start Encrypting Email With iOS Mail, You Need Your Certificates
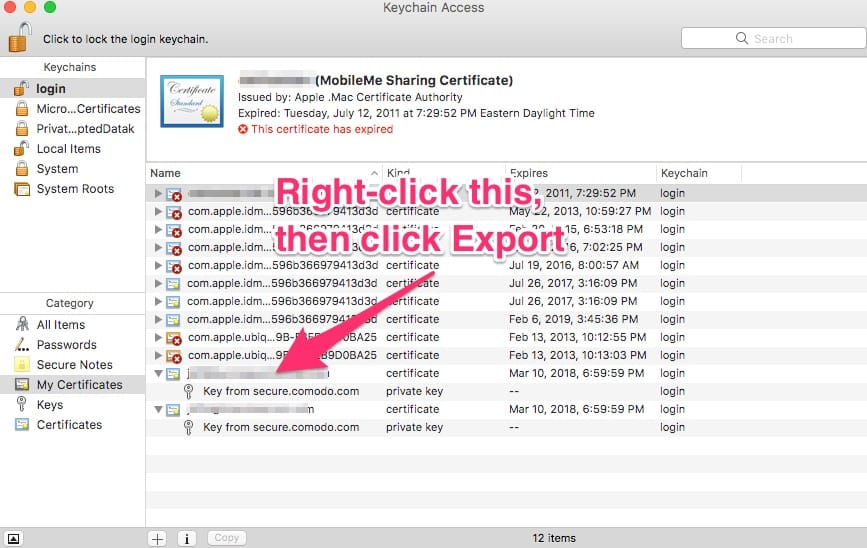
That’s the beginning point, so let’s start there. This tutorial assumes you have already set up S/MIME signatures and encryption in Apple Mail for macOS Sierra. If you haven’t, follow this how-to first. Once that’s done, you need to open Keychain Access on your Mac. Click login, then My Certificates from the left sidebar. Find your certificate. Then right-click on the certificate itself, and choose Export (your email address).
Double-click your public key to get started encrypting email with iOS Mail.
You can give your exported certificate file a name, if you want. Choose a location to save your file, remembering where you saved it. Be sure to choose the correct file format for the certificate bundle. You need to select Personal Information Exchange (.p12). Then click Save.
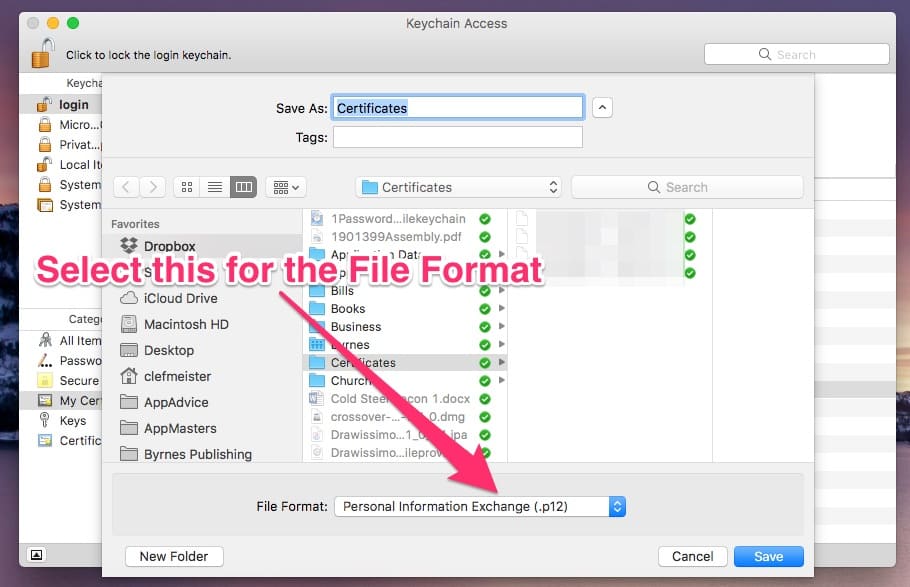
Choose “Personal Information Exchange (.p12)” to export your public key properly
Keychain Access will prompt you to enter a password to protect your exported certificate. Go ahead and do so, remembering what you set as the password. When done, click OK and you’ll be able to save your certificate file.
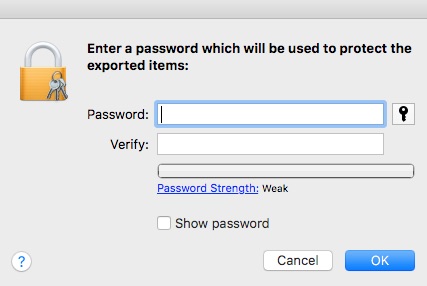
Enter a password for your certificate file
Keychain Access will also ask you to allow the key to be exported. Click on Allow to proceed.
Finally, email your certificate file to an account on your iOS device. Once that’s done, follow these steps on your iPhone or iPad.
Next, Install the Certificate to iOS
Find the email you sent to yourself containing the certificate file. Tap on the .p12 file. A popup will appear to install the profile. iOS will say the profile isn’t signed, but don’t worry – the certificate inside that profile is signed. Tap on Install in the upper right corner.

Tap Install to begin installing the certificate
You’ll be asked to enter a passcode, if you have one set up on your iOS device. Go ahead and do so.
Enter your passcode, if you have one
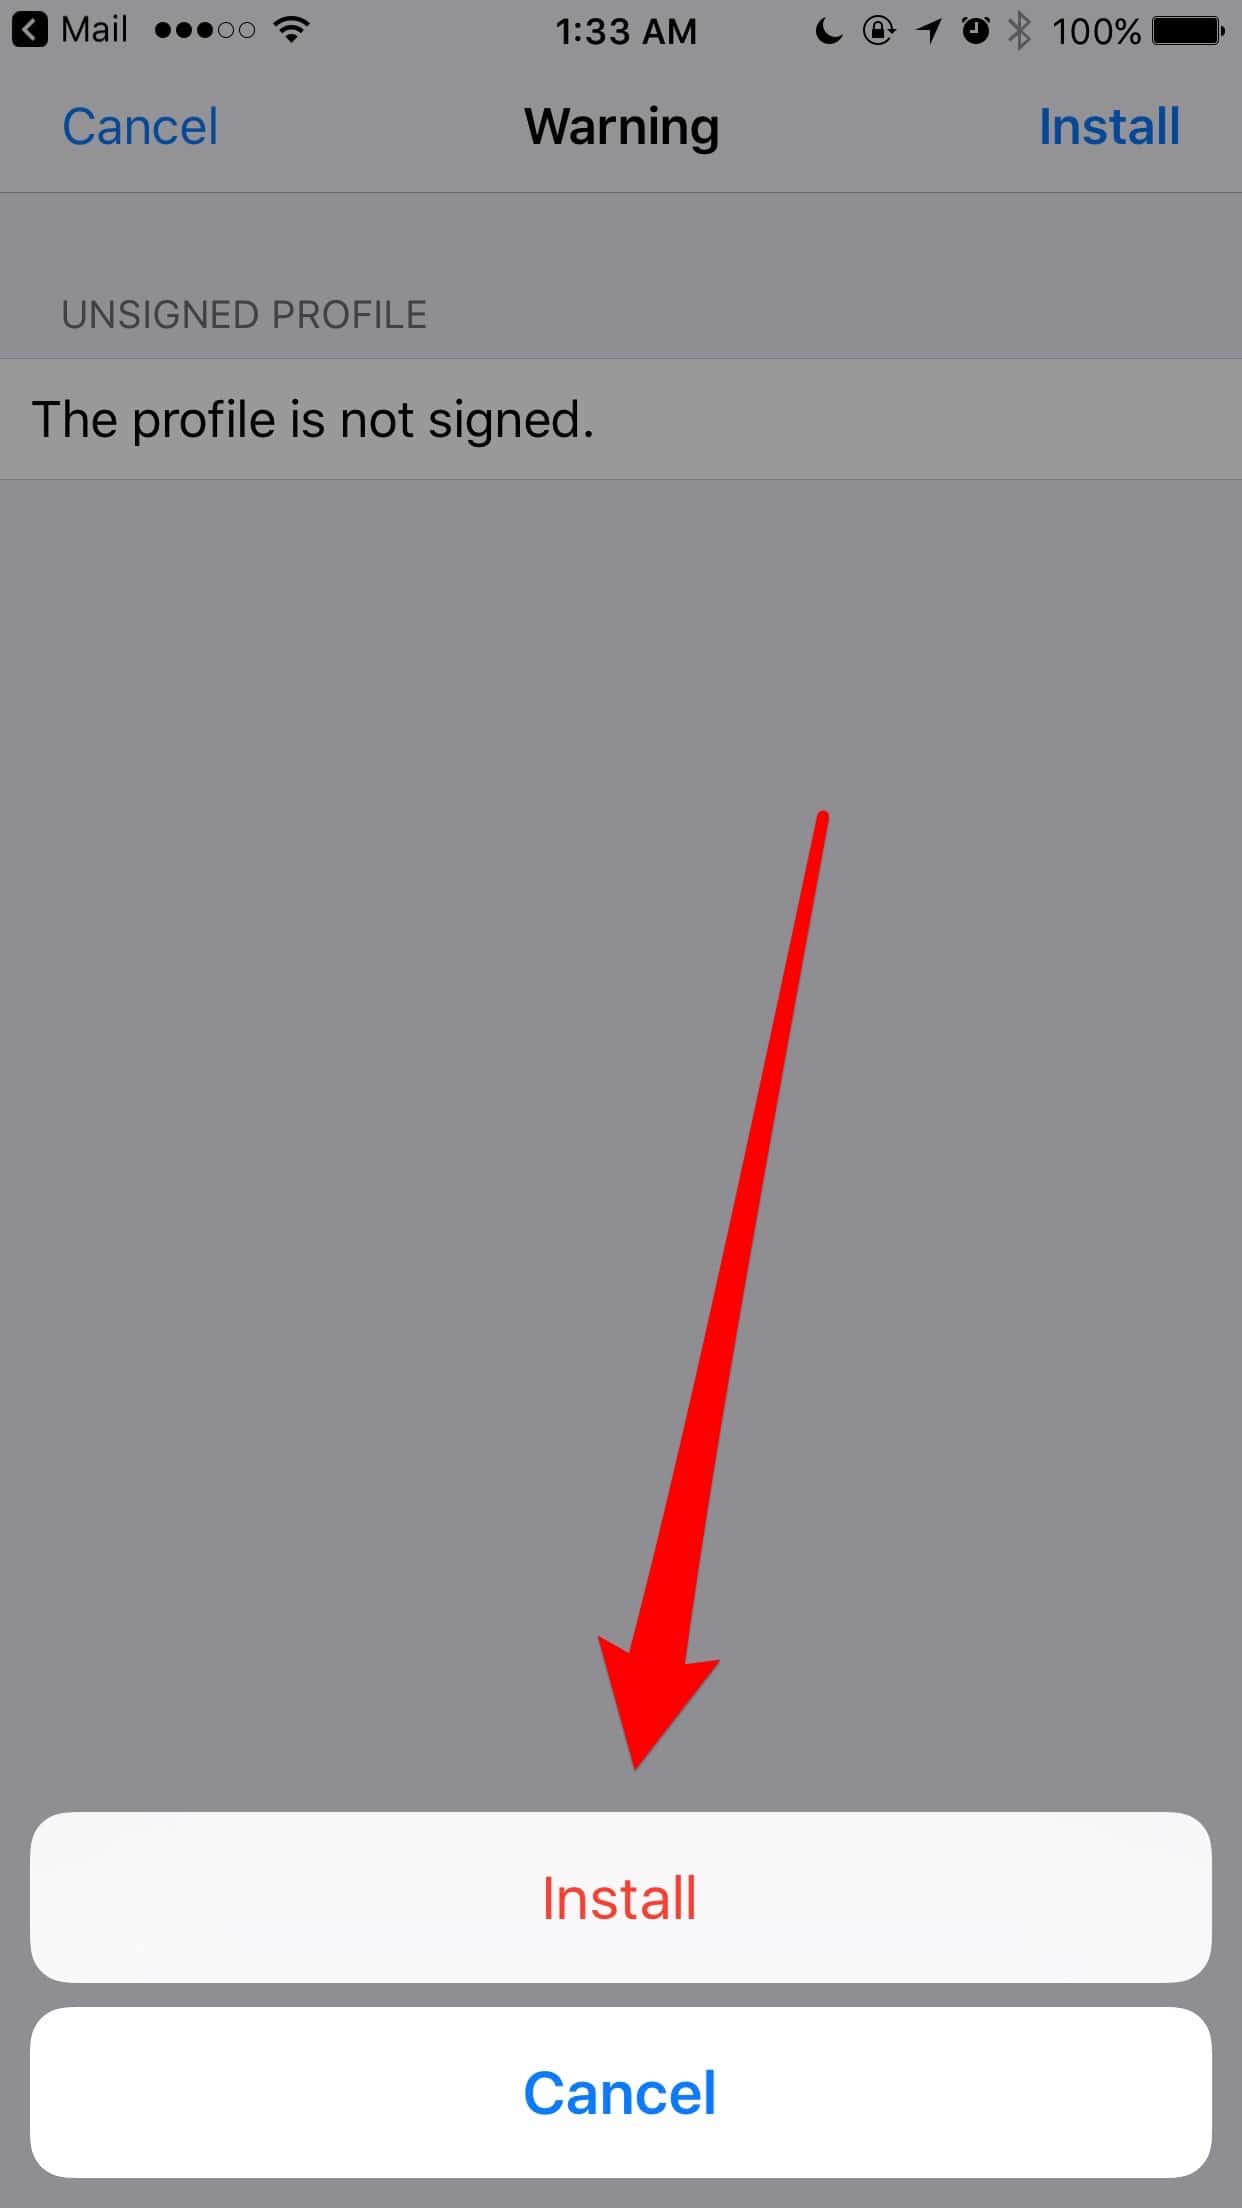
A warning popup will appear, telling you the profile is unsigned. Ignore the warning (trust me), and tap Install in the top right corner.
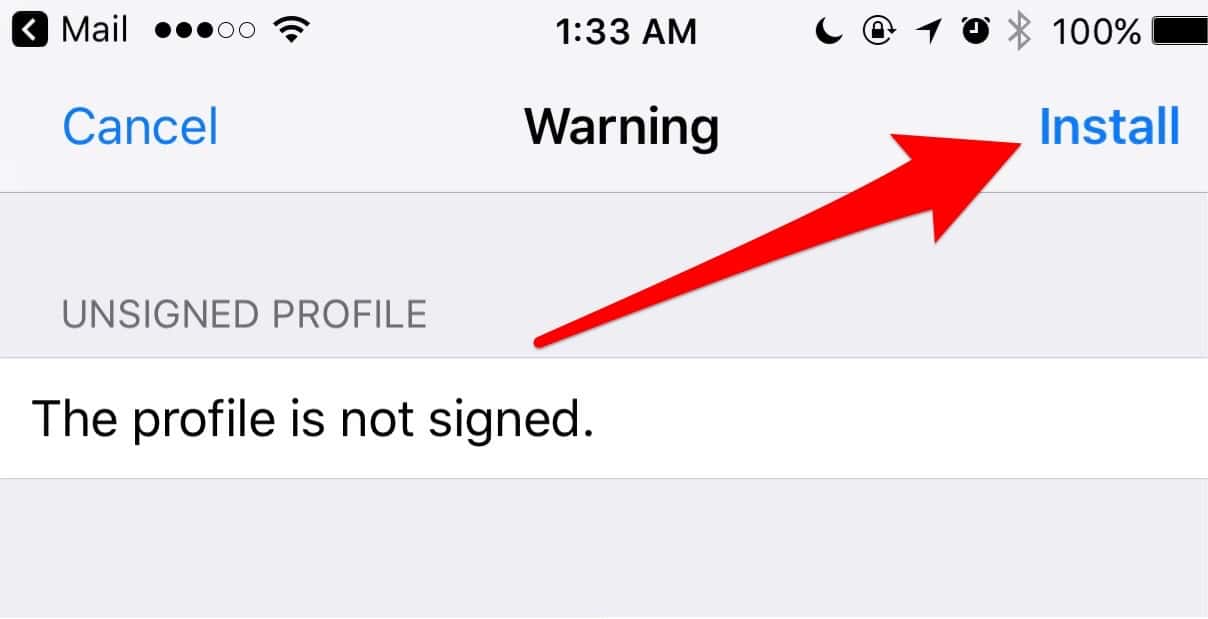
Ignore the warning and tap Install
On the next screen, tap Install at the bottom of the screen.
Finally, tap Install at the bottom of the screen
You’ll be asked to enter the password for the certificate, so type that in. Then, tap Next in the upper right corner.
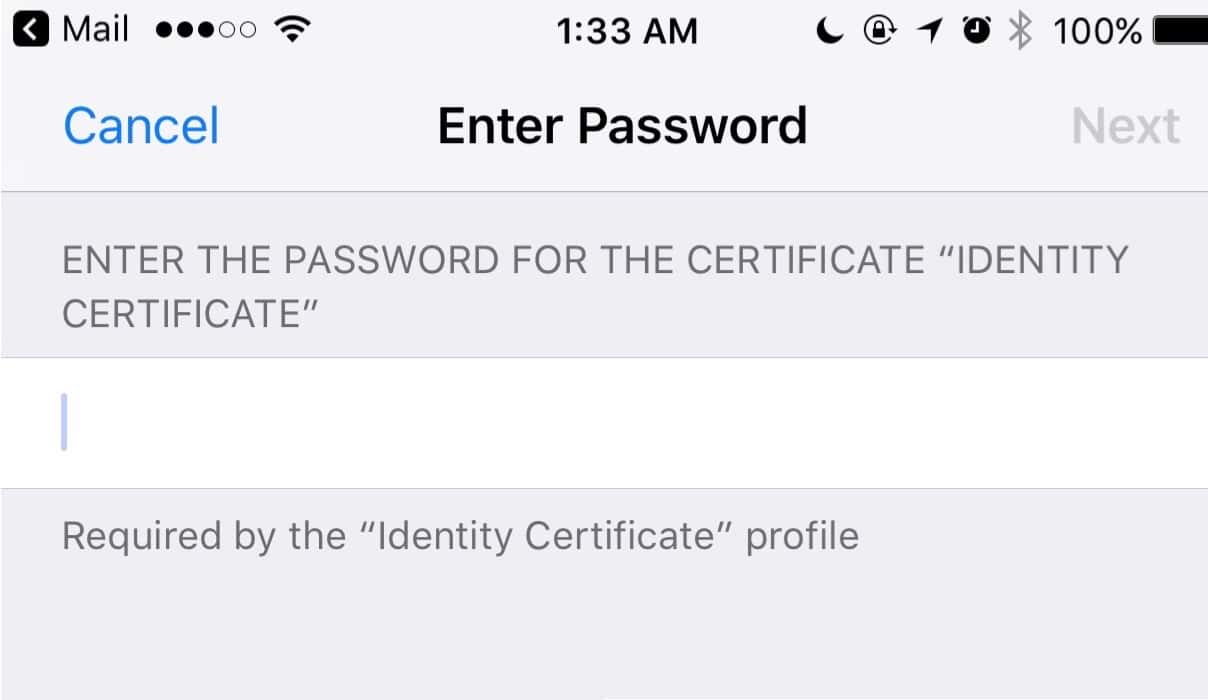
Enter the password for the certificate file
Tap Done, and iOS will install the certificate.
Next: Setting Up S/MIME on iOS
Page 3 – Setting Up S/MIME on iOS
Now We Can Set Up S/MIME on iOS
Once you install the certificate, you’ll need to set up S/MIME to enable encrypting email with iOS Mail. Go to the Settings app, then choose Mail, followed by the account you installed the certificate for. Next, tap on the email address next to Account to get into those settings.
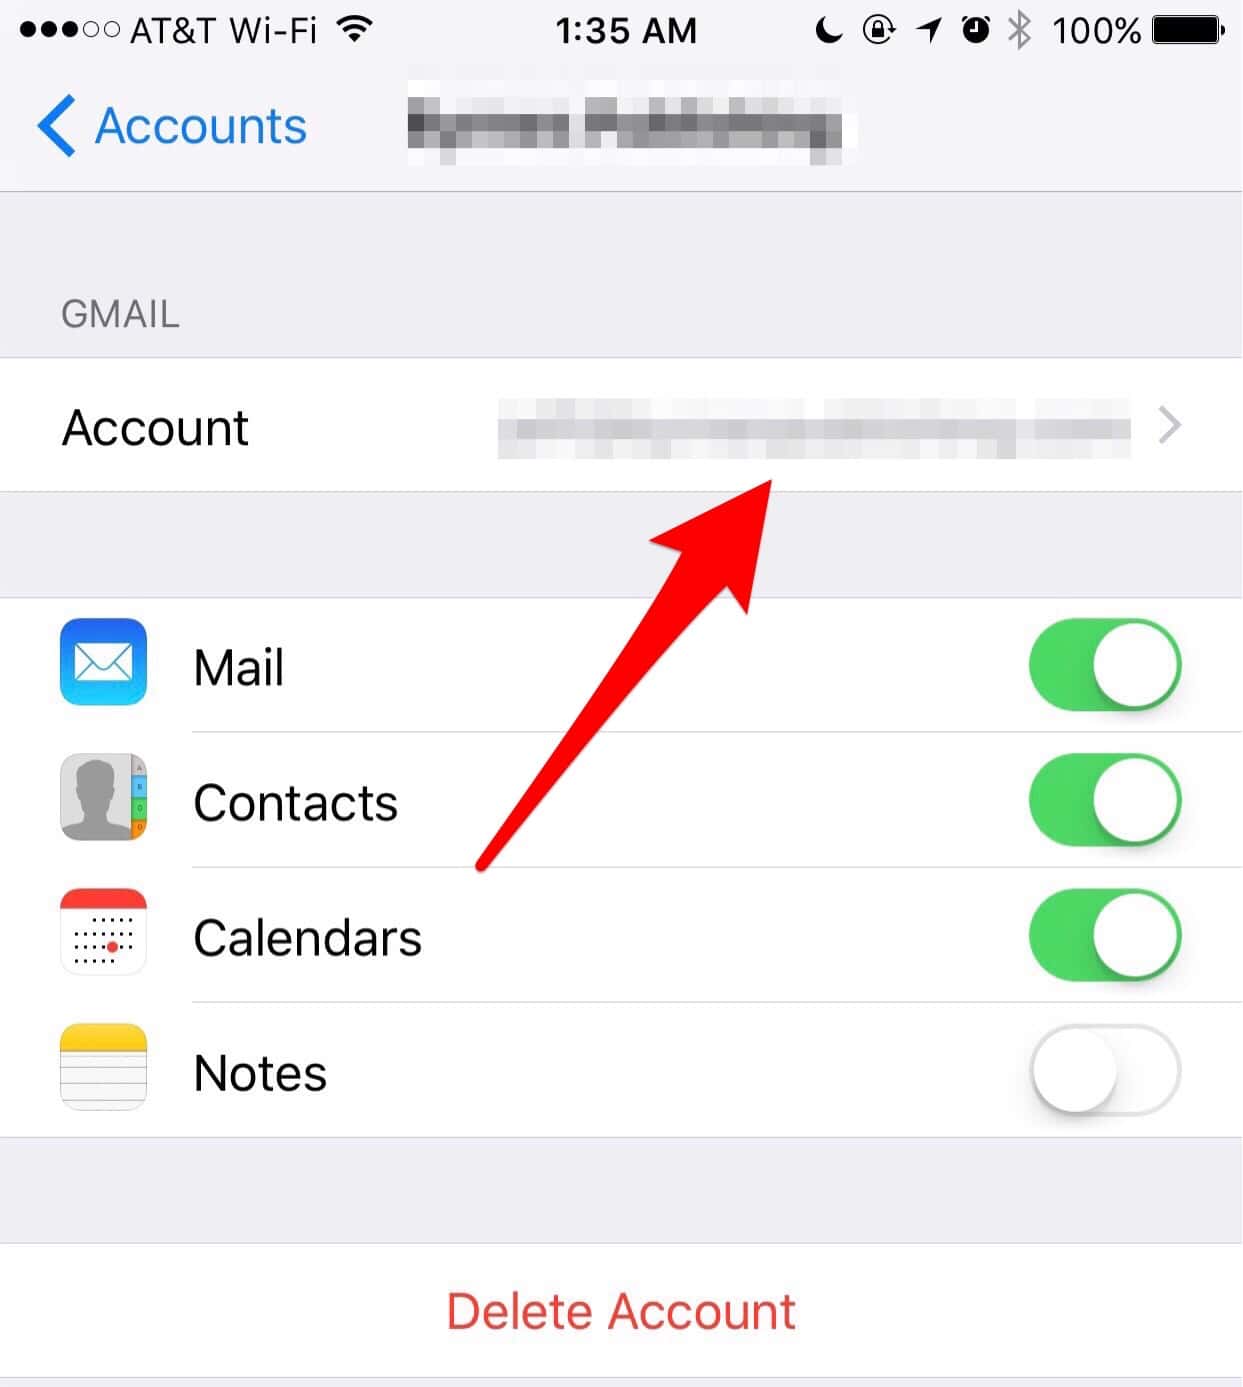
In your Mail settings, choose the account you installed certificates for, then tap the account name
Next, tap the Advanced menu item.

Tap the Advanced menu option
Now, toggle S/MIME on, if it isn’t already. Then tap Sign.
Turning on S/MIME support and setting up your digital signature
Toggle Sign on, and select the proper certificate. If you only installed one certificate, there will only be one listing here. Your iOS device ticks it by default if you only have one certificate. Then tap on Advanced again to go back to the previous menu.

Toggle Sign by Default on, then choose the appropriate certificate
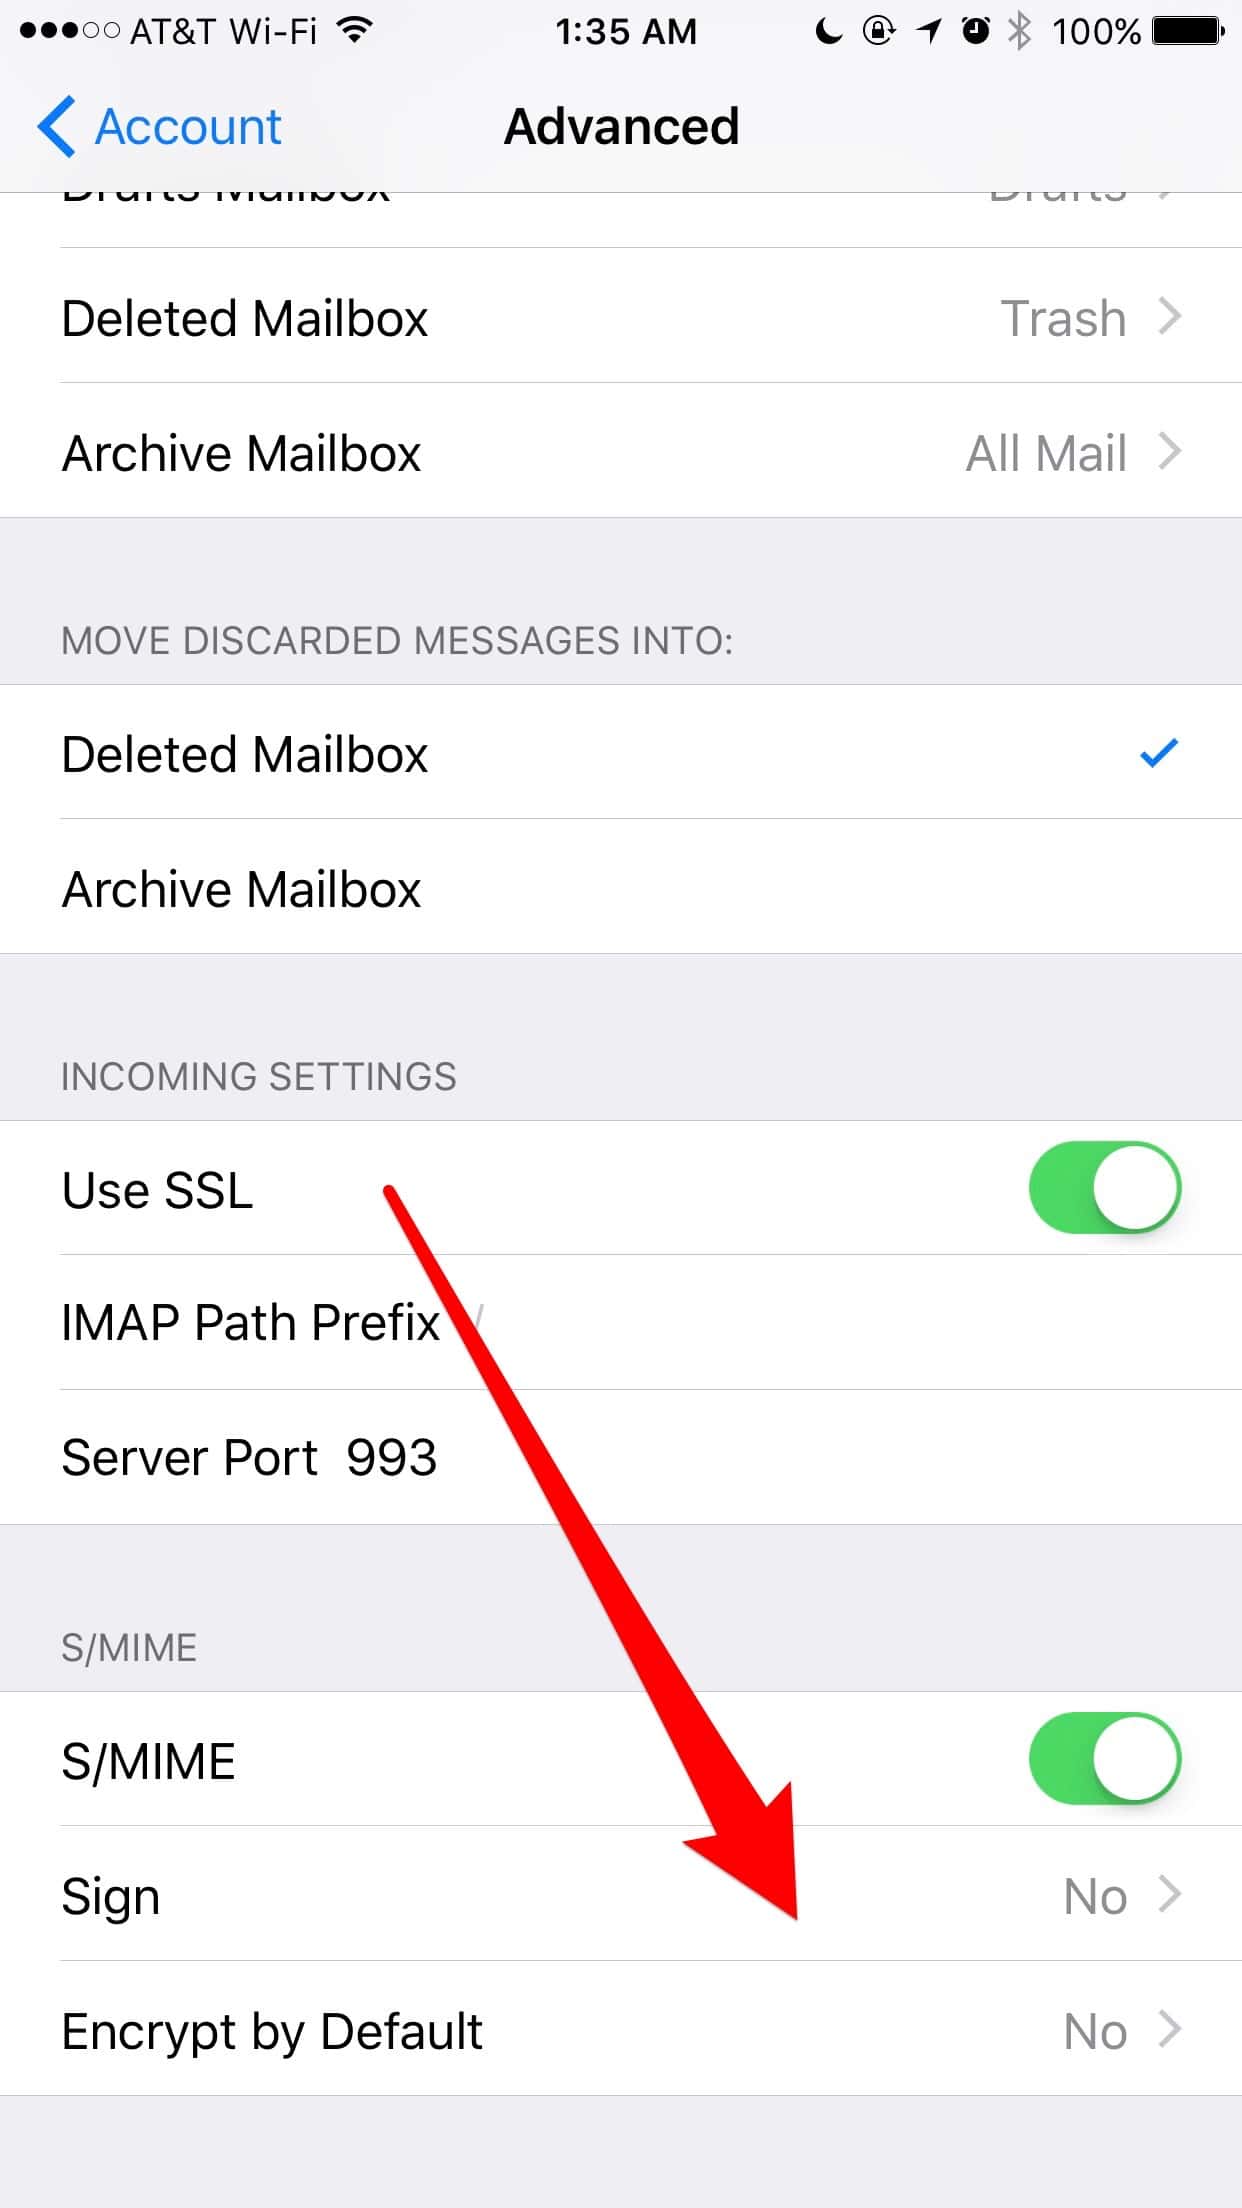
To enable encryption, you’ll need to visit Encrypt by Default, even if you don’t want to automatically send encrypted emails. Tap that option, beneath Sign.
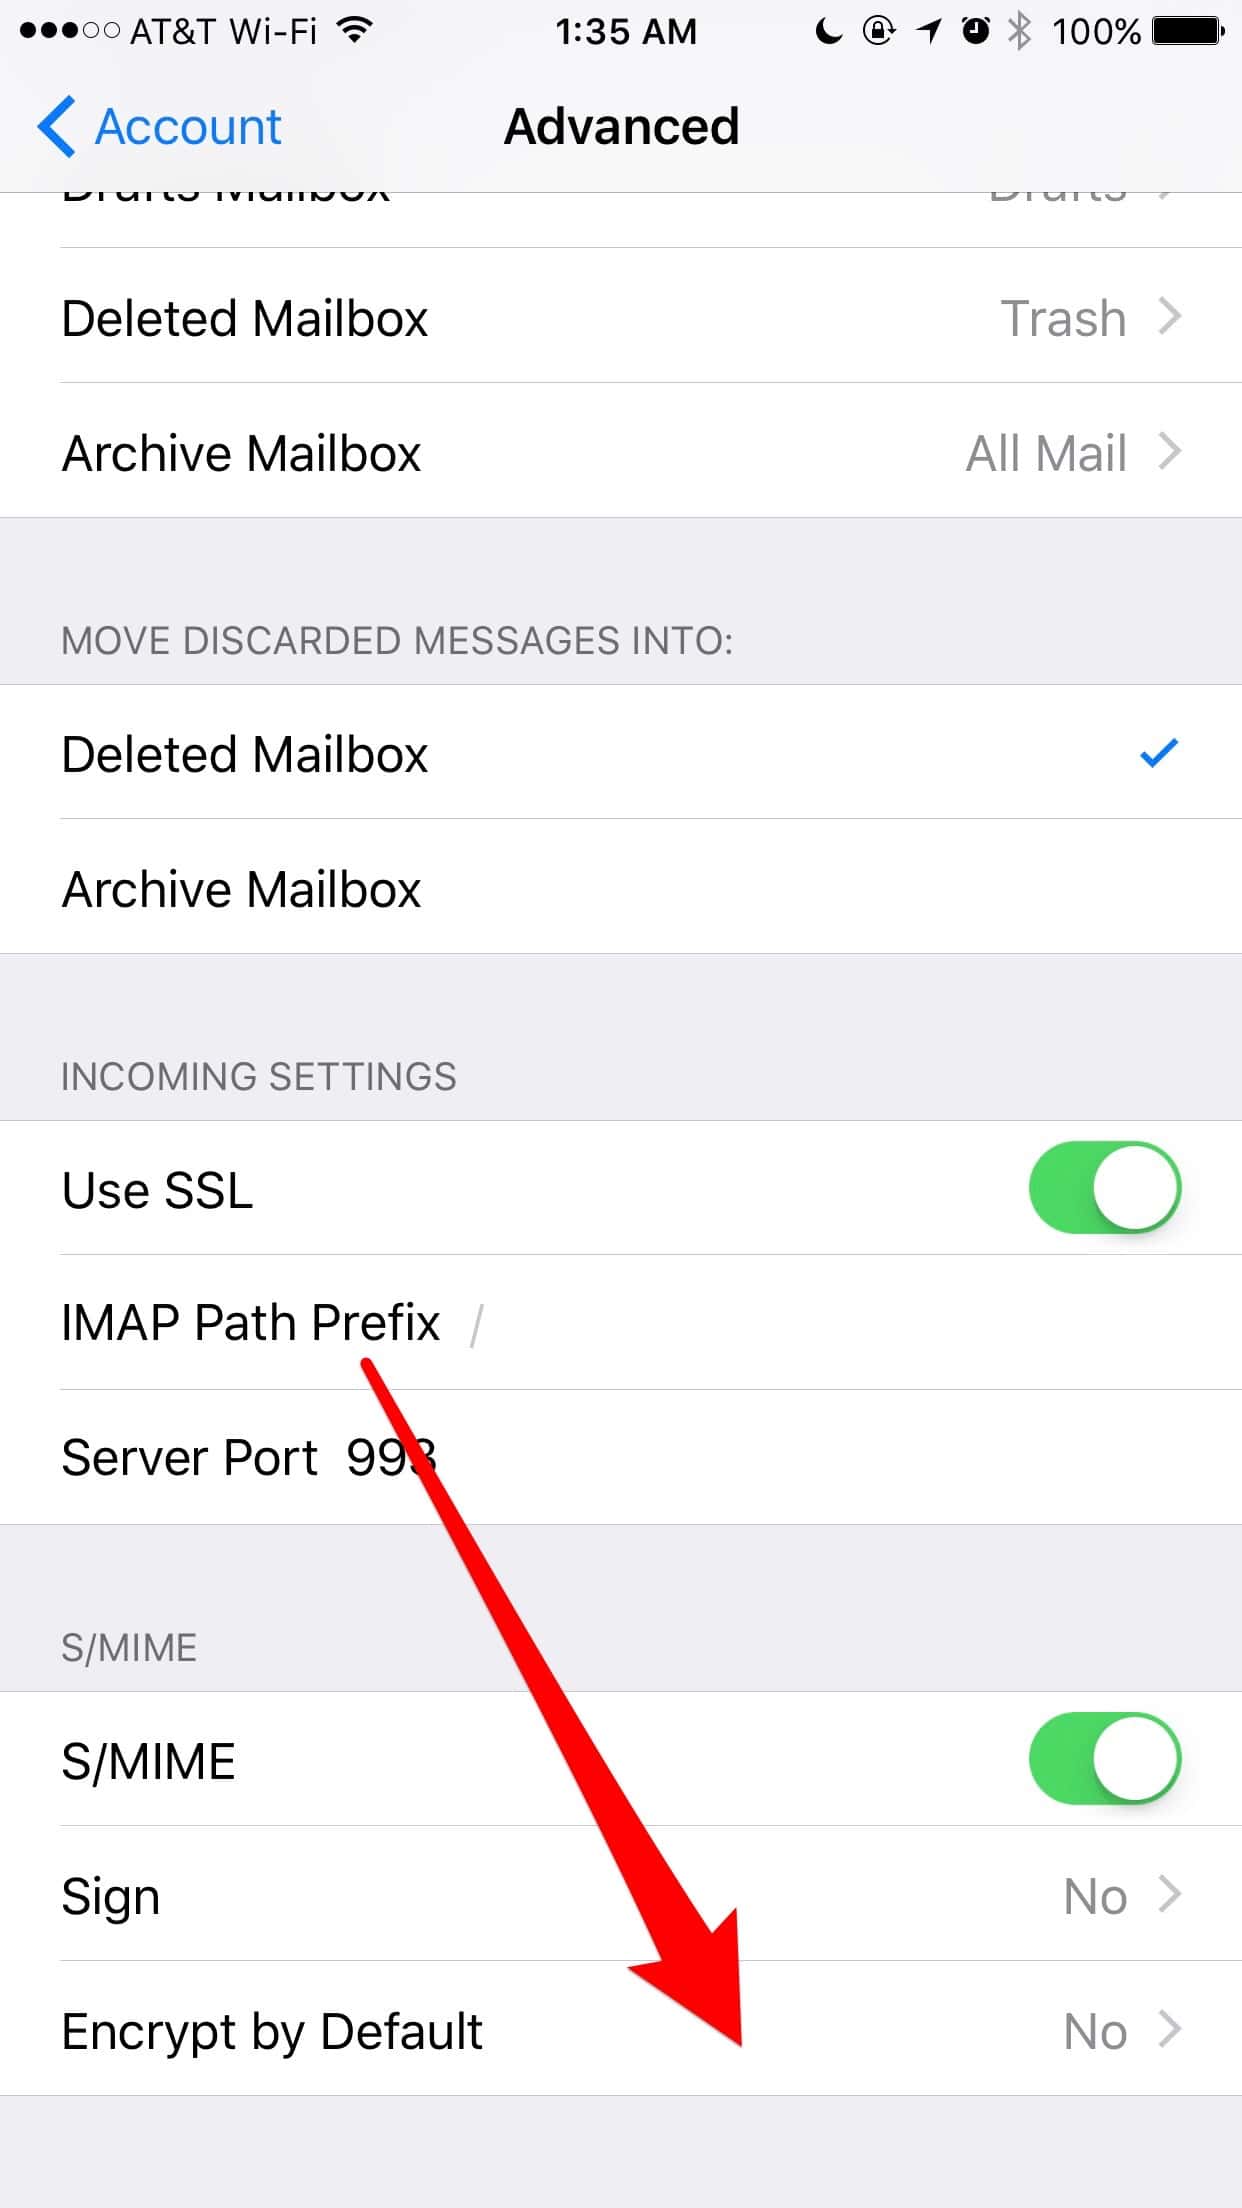
Navigate to the Encrypt by Default setting
Turn on Encrypt by Default. You should do this even if you don’t plan to send encrypted emails all the time. Next, select the correct certificate. If you don’t want to automatically encrypt your emails, you can safely toggle this off now. For whatever reason, not performing this step leaves iOS Mail confused as to which identity certificate to use in encrypting email.
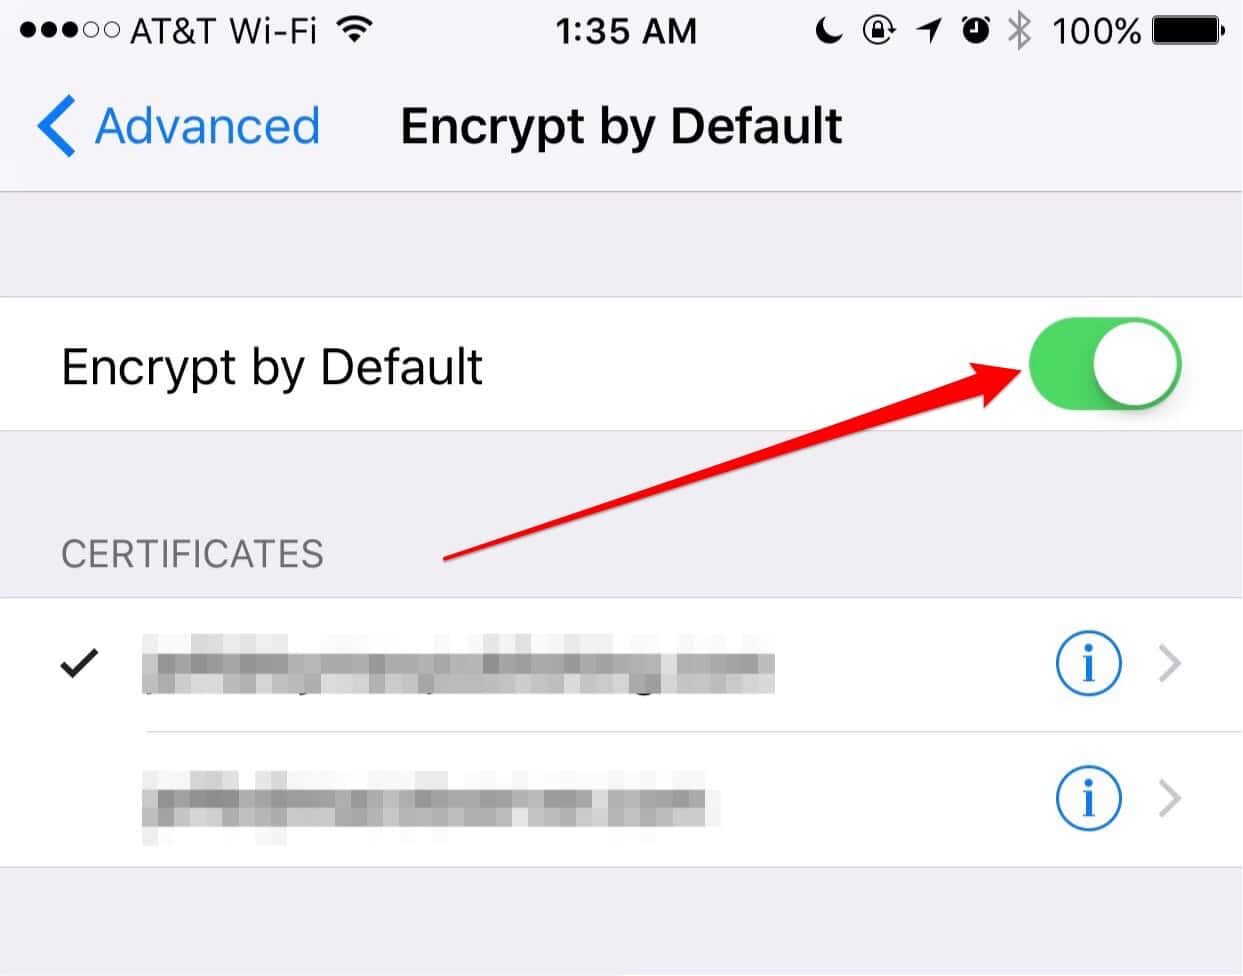
Toggle Encrypt by Default on, then choose the appropriate certificate – you can turn this option off after you’ve chosen the certificate
Related
Once you’ve followed the previous step, tap Advanced and then Account. To finalize everything, tap Done in the upper right corner.

Tap Done from the Account settings menu, or your changes won’t save
Next: Multiple Email Addresses, Exchanging Certificates, Sending Encrypted Email
Page 4 – Next: Multiple Email Addresses, Exchanging Certificates, Sending Encrypted Email
A “Gotcha” for Those With Multiple Email Addresses in the Same Account
If you’re using certificates for multiple email addresses within the same account, things get a bit hairy. You’ll need to choose each certificate at least once in the Settings > Mail > [Account] > Advanced > S/MIME sections for both Sign and Encrypt by Default. After each one, be sure to save changes by tapping Advanced > Account > Done, as above.
If you’re using certificates for multiple email addresses within the same account (multiple From: addresses), things get a bit hairy. You’ll need to choose each certificate at least once in the Settings > Mail > [Account] > Advanced > S/MIME sections for both Sign and Encrypt by Default. After each one, be sure to save changes by tapping Advanced > Account > Done, as above.
It seems that selecting the certificates here activates them for Mail to use for future signing and encrypting. Additionally, based on our tests, it doesn’t seem to matter which certificate is checked here, just so long as each of them has been checked at least once.
Exchange Certificates With Your Recipients
In order for encrypting email with iOS Mail to work, you have to exchange public certificates with your recipients. Simply send an email, asking for a reply back after your recipient has followed the same steps. Forward this article to your recipients so they can follow all of the required steps.
When you receive the reply from your recipient, there should be a blue check mark beside their email address, along with a tick. Now you need to install their public certificate on your iPhone or iPad. Tap the check mark or the email address to get to the next step in doing so.
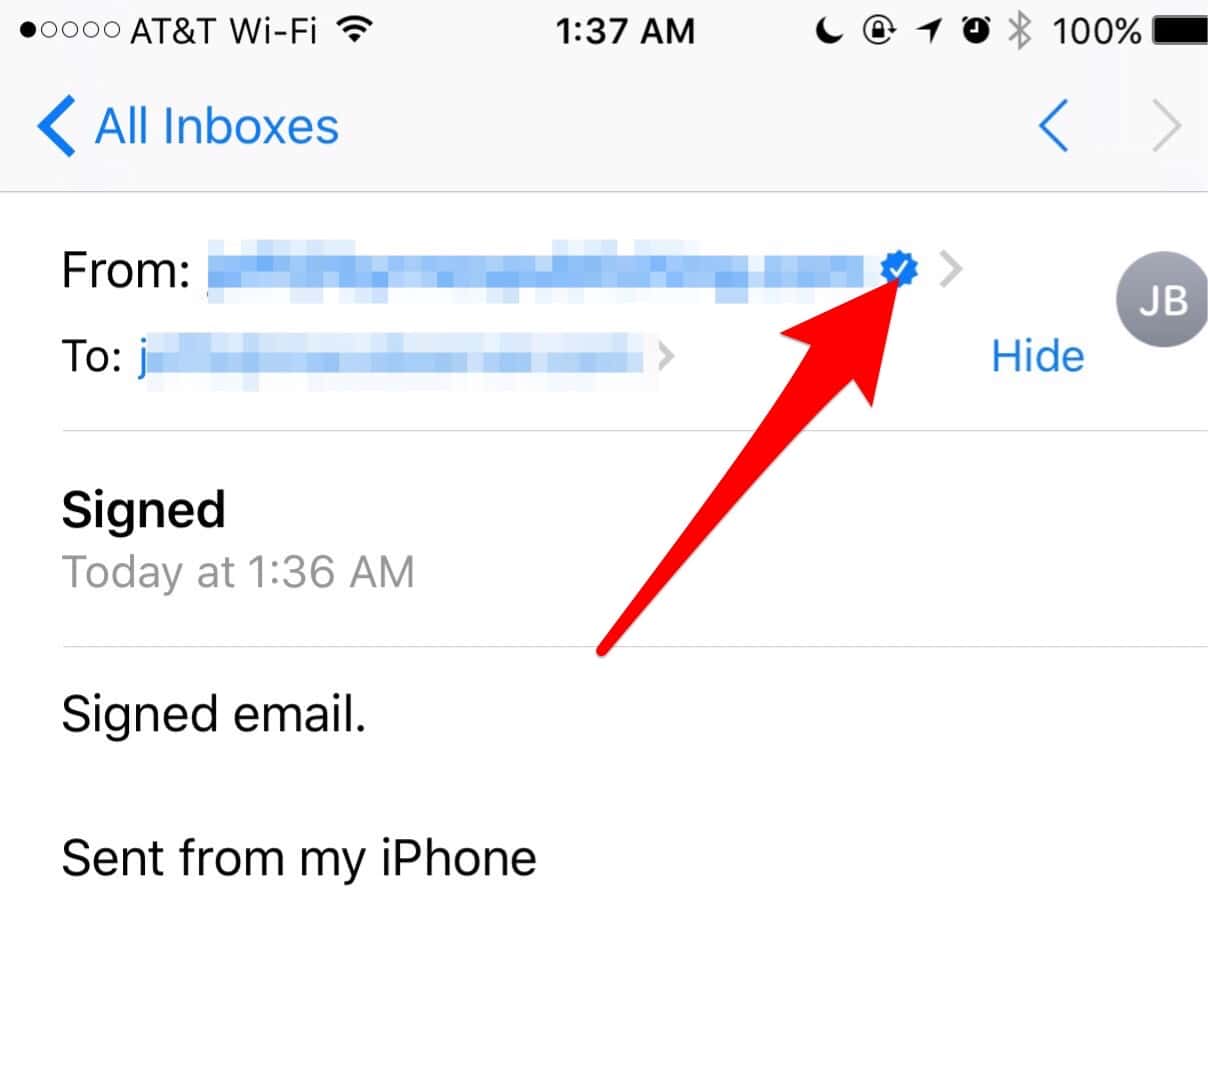
Tap the blue checkmark to get to your recipient’s public certificate
The next screen tells you the recipient signed the email with a trusted certificate. Tap on View Certificate to begin installing the public certificate into the iOS Keychain.
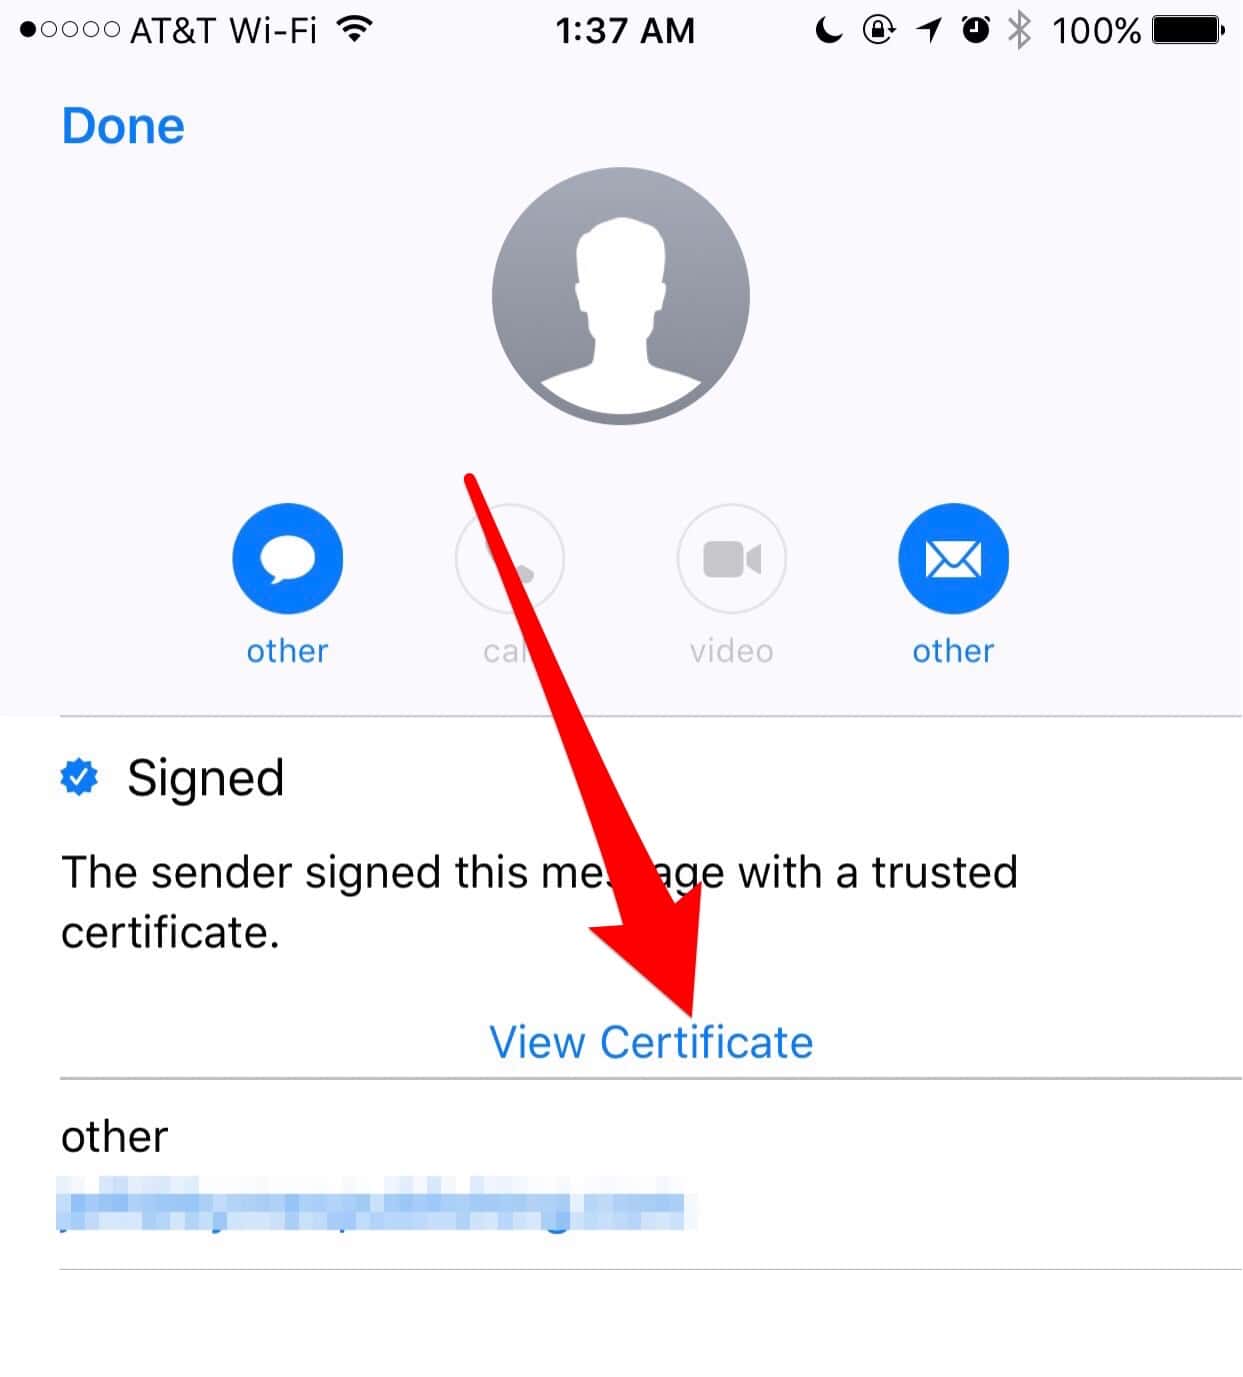
Tap on View Certificate
You’ll see the certificate on the next screen, with an option near the bottom to Install. Tap that menu item, then tap Done in the top right corner.
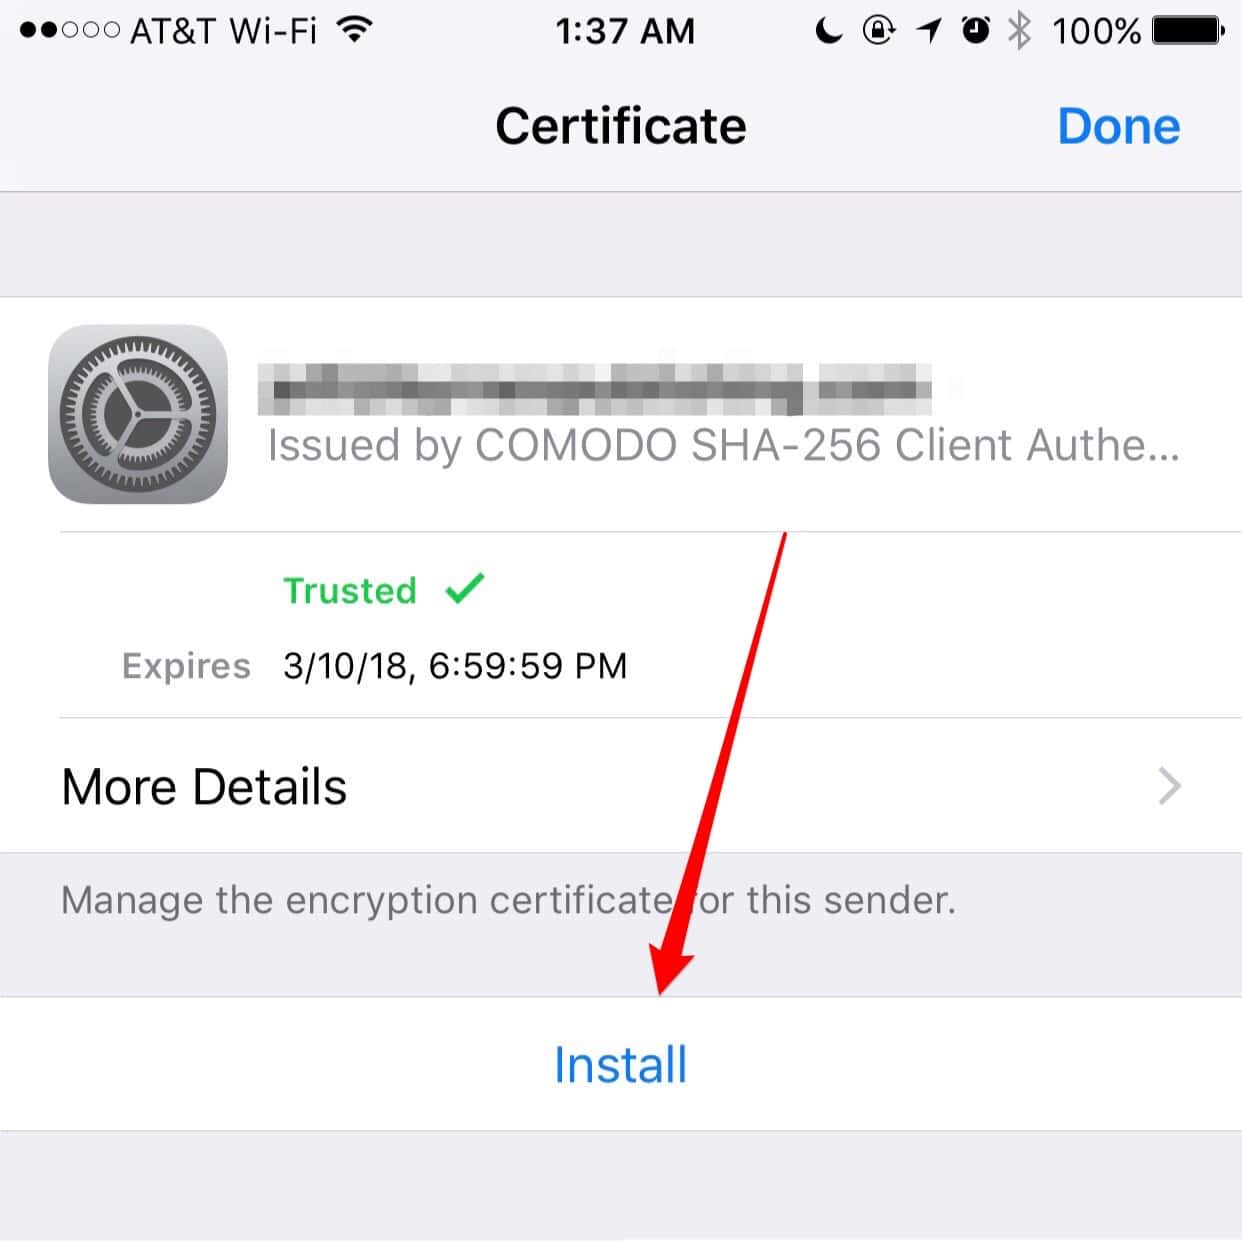
Tap Install to add the public key to your iOS Keychain
Make sure your recipient does this too. Your recipient won’t be able to open your encrypted email if they don’t.
Send Your First Encrypted Email
Now you should be able to send encrypted email with iOS Mail. Go into the Mail app, and compose a new message. After you’ve typed in your recipient’s email address or chosen it from the address book, tap in the To: field again. You should see a blue lock to the right, just beneath the Send button. Tap the unlocked blue lock. That tells Mail to send an encrypted email. Leave the lock alone if it is already locked.
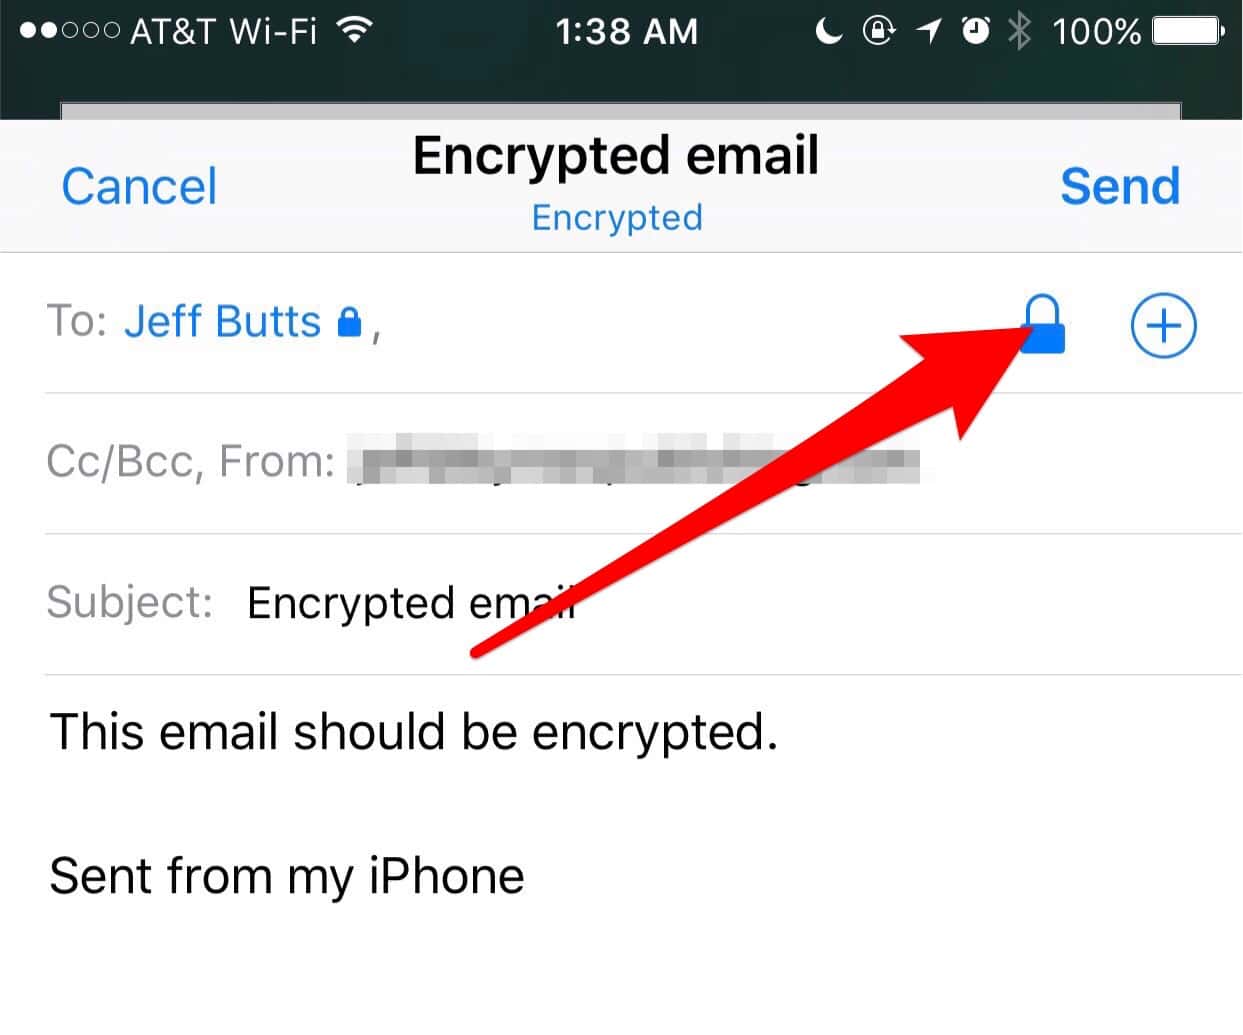
Tap on the blue lock to tell Mail to encrypt the email
Now, go ahead and type out your email, and tap Send. Mail will send your encrypted email. Nobody will be able to read it without your public key.

0 Response to "Encrypting Email With iOS Mail – A How-To"
Post a Comment