Who Wants to Be a Mac Dictator?
Dr. Mac’s Rants & Raves
Episode #198
Have you ever wanted to become a dictator? Not that kind! I mean the kind who talks to their Mac rather than typing. If you don’t like to type, or you can’t type due to repetitive strain injury (RSI) or other ailment, dictation may be just what the doctor ordered.
Dictation can be faster than typing, too. And even if you love to type, dictation can be a nice change of pace. I learned to write on a keyboard and still prefer working that way. But I’ve learned to love occasionally putting my feet on my desk, leaning back, and dictating instead of typing.
Step 1: Enable Mac Dictation
The cool part is, it will probably work with your Mac right now with no additional hardware or software required. To get started:
- Launch System Preferences.
- Click the Keyboard icon (macOS Sierra) or Dictation & Speech icon (Mac OS X El Capitan).
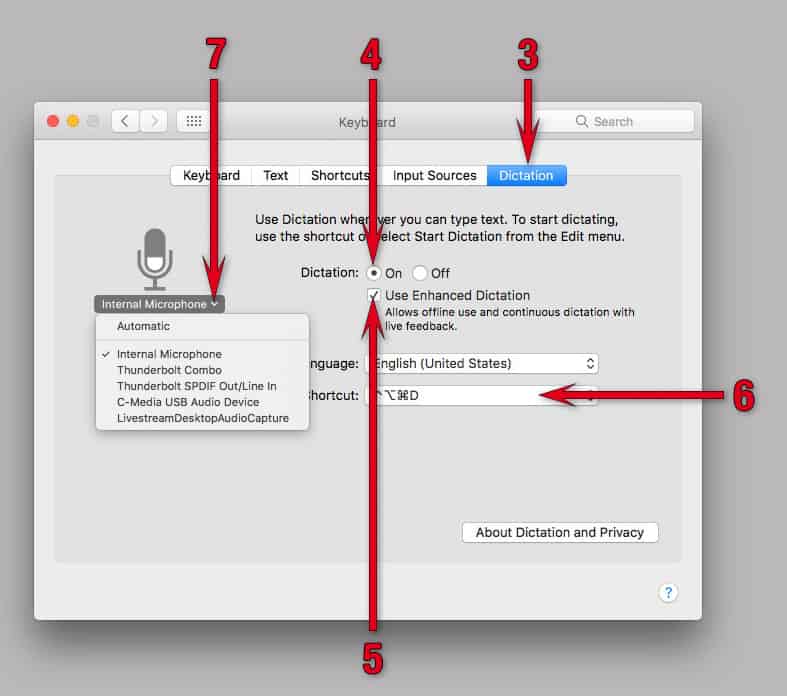
Enabling Dictation in the Keyboard System Preferences pane in macOS Sierra.
- Click the Dictation tab.
- Click the On button.
- Click the Use Enhanced Dictation checkbox if you want to use dictation when you don’t have an Internet connection. Note that it may take up to an hour for everything to download, so only check this box when you’ve got fast, reliable Internet access.
- (Optional) Choose a keyboard shortcut to toggle dictation on and off without opening System Preferences. I use Control + Option + Command + D (for Dictation).
- Choose a microphone by clicking the little inverted caret below the microphone icon and selecting the mic you want to use. The mic icon is your audio level meter; make a loud noise like a clap or a whoop and watch the lights bounce up and down.
Now, to dictate, launch your favorite word processor and turn on dictation. Start talking and watch the words appear on your screen like magic.
Step 2: Enable Advanced Dictation Commands
But wait! There’s more! You can also edit text and control your Mac by voice!
- Launch System Preferences.
- Click the Accessibility icon.

Enabling advanced dictation commands.
- Click Dictation in the list on the left.
- Click the Dictation Commands button.
- Click the Enable Advanced Commands checkbox.
There is no Step 3
That’s all there is to it. Now, you can speak advanced commands such as: Select the next or previous word, sentence or paragraph; Go to the beginning or end of a word, sentence, paragraph; Undo; Redo; Cut, Copy or Paste. You can even switch to or launch applications by voice.

Just some of the things you can tell your Mac to do for you!
Related
While the macOS version is not as powerful and lacks many of the advanced features you’ll find in commercial speech-to-text apps like Dragon Professional for Mac, it works well enough for light use and you can’t beat the price—it’s free (Dragon retails for $300).
My advice: Since dictation works surprisingly well with just your Mac’s built-in microphone, why not give it a try if you haven’t already? Then, if you discover that you enjoy being a dictator, consider a good headset microphone and/or one of Dragon’s commercial dictation offerings.
And that’s all he wrote…


0 Response to "Who Wants to Be a Mac Dictator?"
Post a Comment