How to Upgrade to APFS if Not Done in macOS High Sierra Installer
One of the notable features of macOS High Sierra is the introduction of the APFS file system. APFS is a modern file system that replaces the extraordinarily aged HFS+, introduced in 1998. For reference, here’s a quick overview of the APFS features.

APFS will enable lots of new technologies on your Mac.
When the public beta of macOS High Sierra is released, you’ll likely have the option to stay with the old HFS+ or elect to upgrade your boot drive to APFS. Because Apple has had stunning success with APFS in iOS so far, you’ll probably want to upgrade your Mac to APFS, especially if your boot drive is Flash-based.
Here’s a screenshot of the installer. Note the checkbox circled in red.
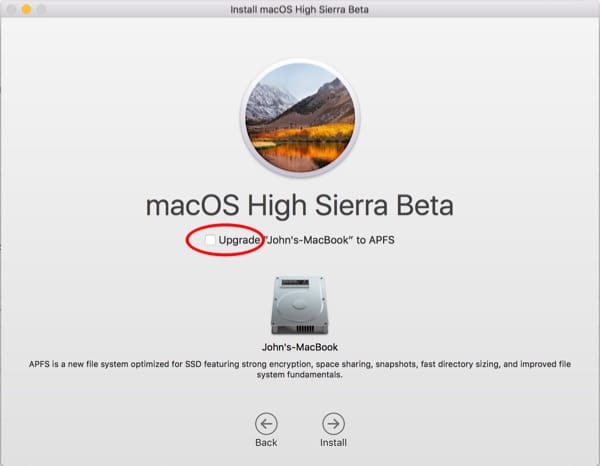
High Sierra (Beta) installer with checkbox for APFS.
What’s mildly tricky here is that the description of APFS, at the bottom in the smaller print, is isolated from the checkbox above the disk icon. I’ve seen several instances in Apple’s forum where people forgot to check the box before a hurried click on the Install button.
If that happened to you, there’s a fix to upgrade to APFS after your installation is done. The upgrade is non-destructive—you won’t lose any files.
The macOS High Sierra Post-Install Upgrade to APFS
1. Of course, compete the installation in the normal fashion. If the upgrade to High Sierra seemed normal, continue to step #2.
2. Restart the Mac into Recovery Mode. To do that, select Restart from the Apple menu and hold down the Command and “R” keys (often abbreviated as CMD+R) until you see the Apple Logo or a spinning globe. You’ll be dropped into the macOS Utilities.
3. Launch Disk utility. Click-select your named boot volume. (Not the physical drive above it.) In this example, it’s called “John’s-MacBook.”
4. In the Disk Utility Edit menu, select “Convert to APFS.” (It will be dimmed if you didn’t properly select the boot volume.)
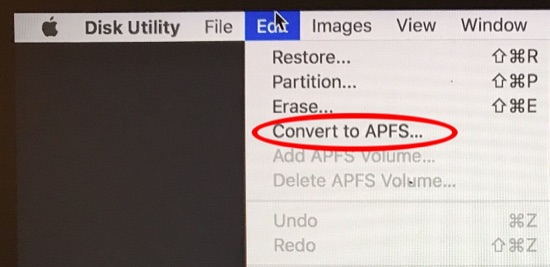
Disk Utility > Edit > Convert to APFS
5. You’ll get a confirmation dialog box. “Would you like to convert Your-drive-name to APFS? The box notes: “APFS volumes cannot be used with older versions of macOS. Converting to APFS cannot be undone.” Click on the “Convert” button.
6. When the conversion starts, you’ll see a progress indicator with all the geeky details if you elect to show them. Click Done when that button becomes undimmed.
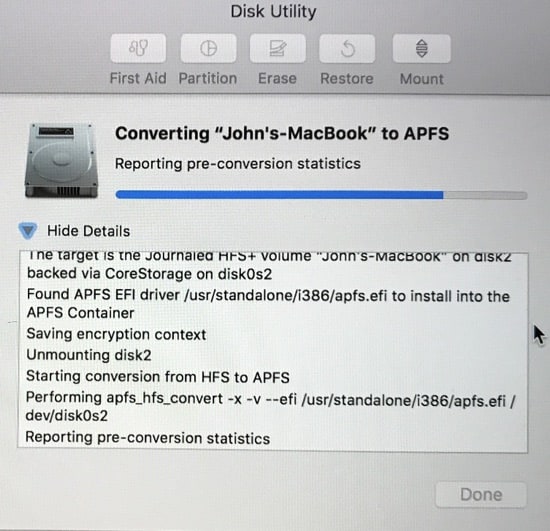
APFS conversion progress. It goes fast.
The results of the conversion will be reported to Apple for QC analysis. This is okay to allow.
The size of the SSD in my MacBook is 256 GB. It took approximately two minutes in my case. That’s fast, and it’s just another indication of the brilliance of Apple’s APFS team.
If you’d like the warm fuzzy of seeing that the drive was converted, on the Mac’s desktop, click-select the boot drive icon. (If you don’t see it, you may have to reveal it with Finder > Preferences > General) Then hold down the Command key and type “I” (CMD+I) for “Get Info.” You’ll see something ike this:
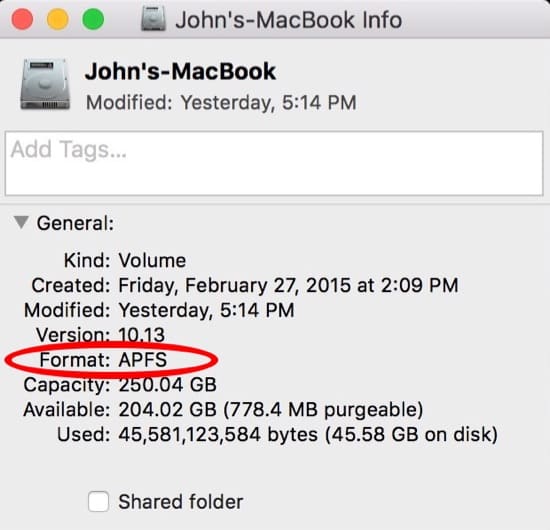
Get Info for an APFS volume.
If you’d like to read more about the features of APFS, I also recommend these other publications. “APFS: What You Need To Know About Apple’s New File System.” and “10 Things You Should Know About APFS; Apple’s New File System.” Some of the discussion in these articles refers to iOS, but it’s all the same file system in iOS and macOS.
0 Response to "How to Upgrade to APFS if Not Done in macOS High Sierra Installer"
Post a Comment